Creation and Testing of a Custom Template
Create a Template
To create a template, you can access the platform and select "Training Material > Template" from the left menu.
At this point, you can click on the "New Template" button and enter all the required information.
Description of the fields to be entered
Field | Description |
Template Name | The name under which the template will be stored on the platform. |
Company | The company in which the template will be used or "global" if the template will be used by all companies. |
Landing Page | The HTML page returned to the target when they select the link contained in the email. The landing page can be the default one or custom-made for the end customer. You can also enter the URL of the landing page (if not specified, the system will redirect the user to the one set as default). |
Type | The type of template, whether Email, SMS, QR Code, or USB. |
Language | The language in which the text contained in the email to be sent to the target is written. |
Estimated Difficulty | A number between 0 and 1 indicating the level of difficulty in recognizing the phishing email. The range goes from 0 (easier) to 1 (harder). |
Tag | To better categorize the template (e.g., Real Brand). |
Countries | The countries of the targets where the template can be used. The field allows multiple values, enabling the use of the template in several countries. The default value is "All countries." |
Forced | Selected if you want to force the use of the template in a phishing campaign. |
Attachment | Selected if you want to include one or more attachments. |
Template Content - Preview
Once the template has been successfully created, you land on the "Preview" section where you can enter the content of the template.
The content must be entered translated into the various languages available for the template itself.
In the "Subject" row, you can enter the subject of the email that will be viewed by the target user of the template.
In the "Sender" row, you need to enter the sender's name and the sender's address from which you want the email to be sent.
NOTE: The sender domain used must be chosen from those authorized for sending, as indicated in the following article.
By clicking on "Content", you can enter the content of the template, which will be the body of the email that the user will receive. You can use any HTML editor to generate the content of the template, which will then need to be copied and uploaded to the platform.
The "preview" functionality allows you to see the preview of the HTML.
Insert Placeholders
For the template to function correctly, it is important to insert the placeholders. These placeholders will be replaced at the time of execution.
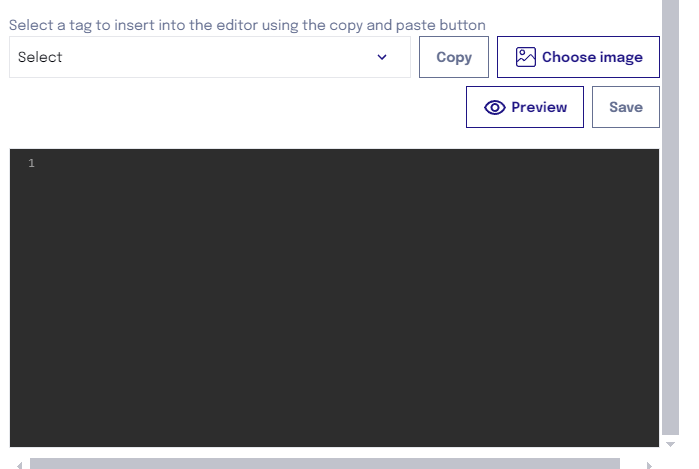
All placeholders can be selected from the corresponding dropdown menu. Once you select the item of interest, clicking on "copy" will give you the placeholder to insert into the template.
Below is the complete list of placeholders that can be used in the template text.
SURNAME {{.LastName}} Last name of the target.
NAME {{.FirstName}} First name of the target.
EMAIL {{.Email}} Email address of the target.
TRACKER {{.Tracker}} An alias for <img src=“{{.TrackingURL}}”/> The tracker is an invisible image used to track the event of the email being opened by the recipient. If the image is not automatically downloaded, the opening event is NOT recorded (the click or report event is not affected).
TRACKING URL {{.URL}} Phishing URL. If no landing page has been configured, the default one will be used.
SENDER {{.From}} The spoofed sender.
TELEPHONE NUMBER {{.Position}} Target phone number.
INTERNAL RID {{.RId}} Unique ID of the target.
BASE URL {{.BaseURL}} The base URL with the path and the stripped rid parameter. Useful for creating links to static files.
PHISHING URL {{.TrackingURL}} The URL of the tracking manager.
COMPANY LOGO {{.CompanyLogoAsDataURL}} Company logo.
DATE {{.CurrentDate+0}} The current date.
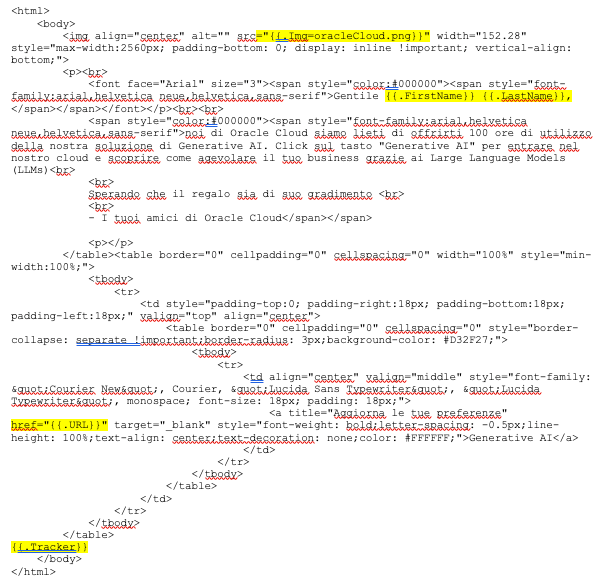
IMAGE {{.Img=<image file name}} The image present in the HTML template.
Below is an example of HTML.
Upload an Image in the Template
If you want to insert an image in the template, simply click on "Select Image" and upload the image you want to use to the platform.
Once the image is uploaded, it will appear at the bottom of the list of those already available on the platform. You can then select the image and click on "Copy" to obtain the placeholder to insert in the HTML. The image placeholder will appear as {{.Img=imagefilename.png}}.
Global Information
The "Global Information" section of the template contains various elements that allow you to configure and customize the general details of the template. Let's look at each item in detail:
Template Name: to identify the template within the system.
Associated Landing Page and Related URL: You can view or modify the landing page to which the template is linked. The URL corresponds to the web address of the landing page, which will be used in communications generated with the template. If not present, the system will propose the default one.
Associated Tags: Tags are keywords that help classify and filter templates.
Estimated Difficulty Level: Indicates how complex the use of the template is.
Attachments: You can decide whether to include attachments in the template.
Template Activation: If a template is not active, it will not be selected for campaigns.
Template Forcing: Allows you to force the inclusion of the template in a specific campaign.
Languages of a Template
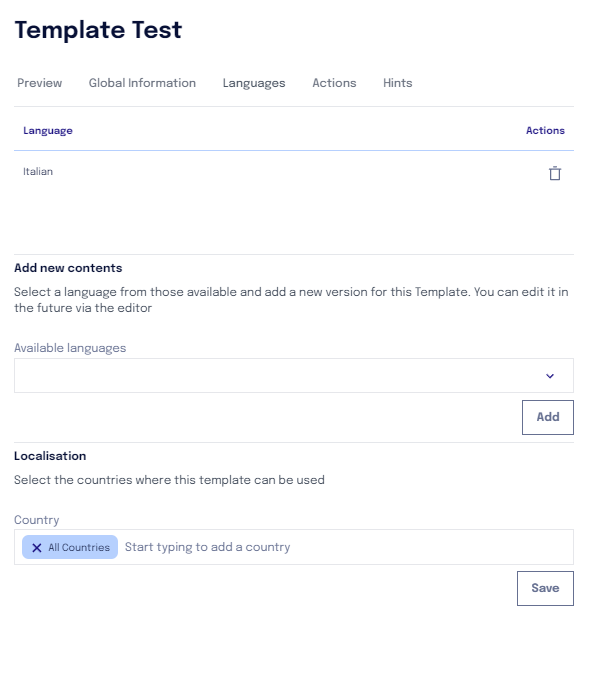
The "Languages" section of a template offers the following functionalities:
Viewing Available Languages: You can see a list of the languages in which the template is currently available. This allows you to monitor for which languages a version of the template has been prepared.
Deleting a Language: If a certain language is no longer needed, you can remove it from the list. The template will no longer be available for the deleted language.
Adding New Languages: You can add additional languages in which the template will be made available. After adding a language, you will need to translate the content of the template.
Modifying Availability by Country: You can define or modify the countries in which the template will be available.
Adding Clues to a Template
It is essential to insert specific clues for each phishing template so that they provide key suggestions that help the user recognize the signs of a potential attack. The clues must be customized for each phishing scenario, reflecting the unique characteristics of the message the user has received.
To insert a clue, within the desired template, click in the "Clues" section. Click on "New Clue" and enter:
Class: identifies the type of clue, specifying which theme it refers to.
Icon: image to associate with the clue.
Priority: progressive number of the clue. This will influence the order of presentation of the clues on the landing page.
Clue Content: the content of the clue visible on the landing page.
Testing a Template
The purpose of the template testing functionalities is to allow the platform to verify that there are no errors in the template that would prevent its use in campaigns.
To test a template, you can select "Training Material > Template" and select the template you want to test.
Once you have chosen the template, in the "Actions" section, you have two possible options:
The "Single Language Template Test", for example, "Test Template (IT)", verifies the correctness of only the selected language and sends the template itself to the entered address.
The "Template Test" verifies the correctness of ALL languages and sends the template in only the selected language to the entered address. Therefore, it is advisable to always use the generic "Template Test" and not the single language one.
NOTE: If a template test is performed and errors are found in the languages, a red banner will be displayed indicating the presence of errors in the template. The banner will specifically indicate which languages have issues, facilitating timely and targeted correction.
The "Campaign Test" functionality present in the "Release Management" section when selecting a campaign, instead aims to send, in only the selected language, all templates included in a campaign. Therefore, the campaign test is not an effective means to verify the correctness of the templates as a campaign may successfully pass the test in one language but then fail activation if the templates contain errors in other languages.
Date of creation of a Template
Within the section ‘Training Material’, in the category ‘Templates’ for MSP users, it is possible to access the phishing templates. In addition, to make it easier to find new ones, a column called ‘Creation Date’ has been added to the table of phishing templates. This column allows you to quickly identify the most recent templates and keep your simulations up-to-date.


