
Microsoft Entra SCIM (provisioning) configuration
1. Introduction
Provisioning is the process of automatically creating, updating, or suspending user accounts in an application when changes occur in the master directory (in this case, Microsoft Entra). By setting up provisioning, you can ensure that user accounts in your applications remain up-to-date in Cyber Guru platform without manual work.
This guide helps you configure provisioning for an application in Microsoft Entra.
2. Key Terms
Microsoft Entra: Microsoft’s online identity service that helps manage user access and security.
Provisioning: Automatically creating, updating, or suspending user accounts in a connected application based on information in Microsoft Entra.
Application: Any online service or tool used by your organization (for example, HR software or a cloud-based service).
SCIM: A protocol used to simplify user provisioning (if your application supports SCIM).
3. Before You Begin
Make sure you have administrator access to Microsoft Entra. If you are not sure, contact your IT support.
Have a clear understanding of which application you want to provision users for. In most case you will have to create a new application.
You must have received the tenant URL and token from Cyber Guru
All attributes needed by the Cyber Guru platform must be present in Entra as users attribute values
4. Step-by-Step Provisioning Setup
4.1. Step 1: Logging into Microsoft Entra
Open your internet browser and navigate to the Microsoft Entra admin page.
4.2. Step 2: Navigating to the Application
Once logged in, look for the navigation panel. Click on “Enterprise Applications” (or “Apps”).
In the list of applications, find the one you want to configure for provisioning and click on it.
If the application is not already in the list, it might need to be added as a new application.
At the top of the “Enterprise Applications” page, there is typically a button that says “New Application” or “Add Application.”
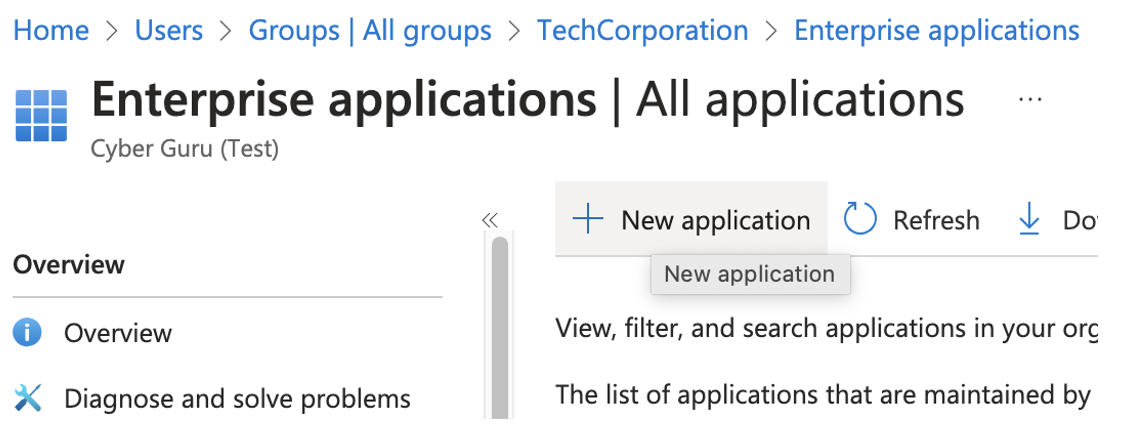
Click on that button.
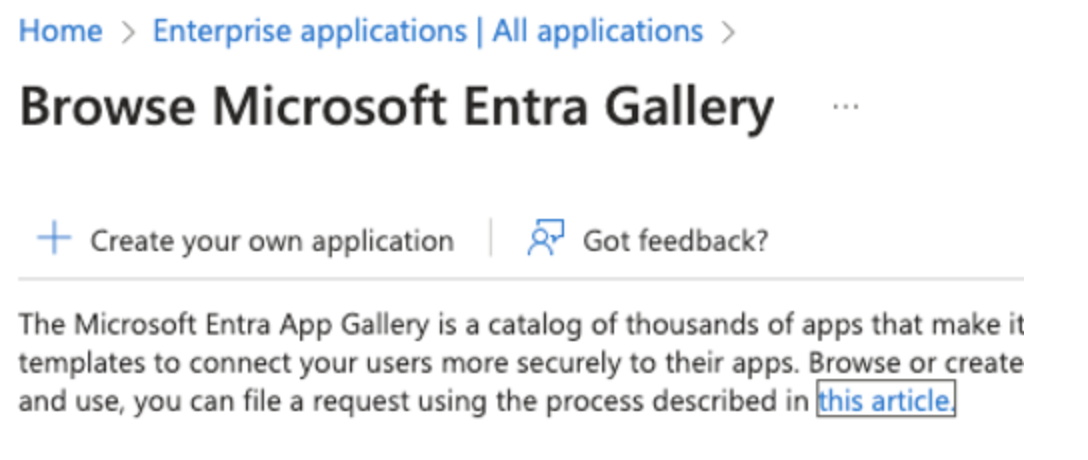
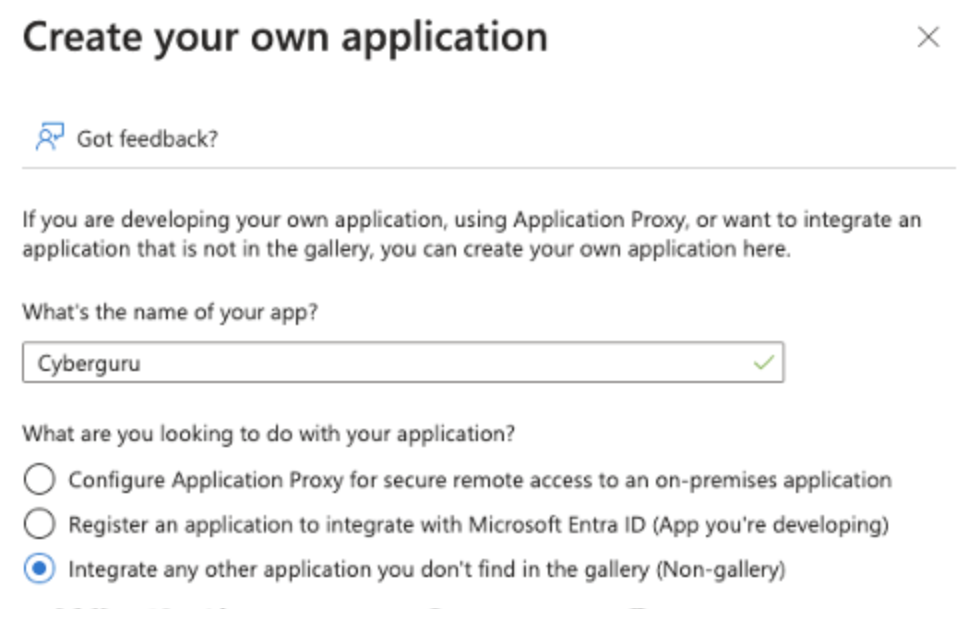
Click on “Create your own application”
4.3. Step 3: Finding the Provisioning Section
On the selected application’s page, find the “Provisioning” option in the menu. This is usually visible along with other settings like “Single Sign-On.”
Click on “Provisioning” to access the configuration settings or “Get Started “ in the tab “3. Provision User Accounts”

Then proceede to Connect your application
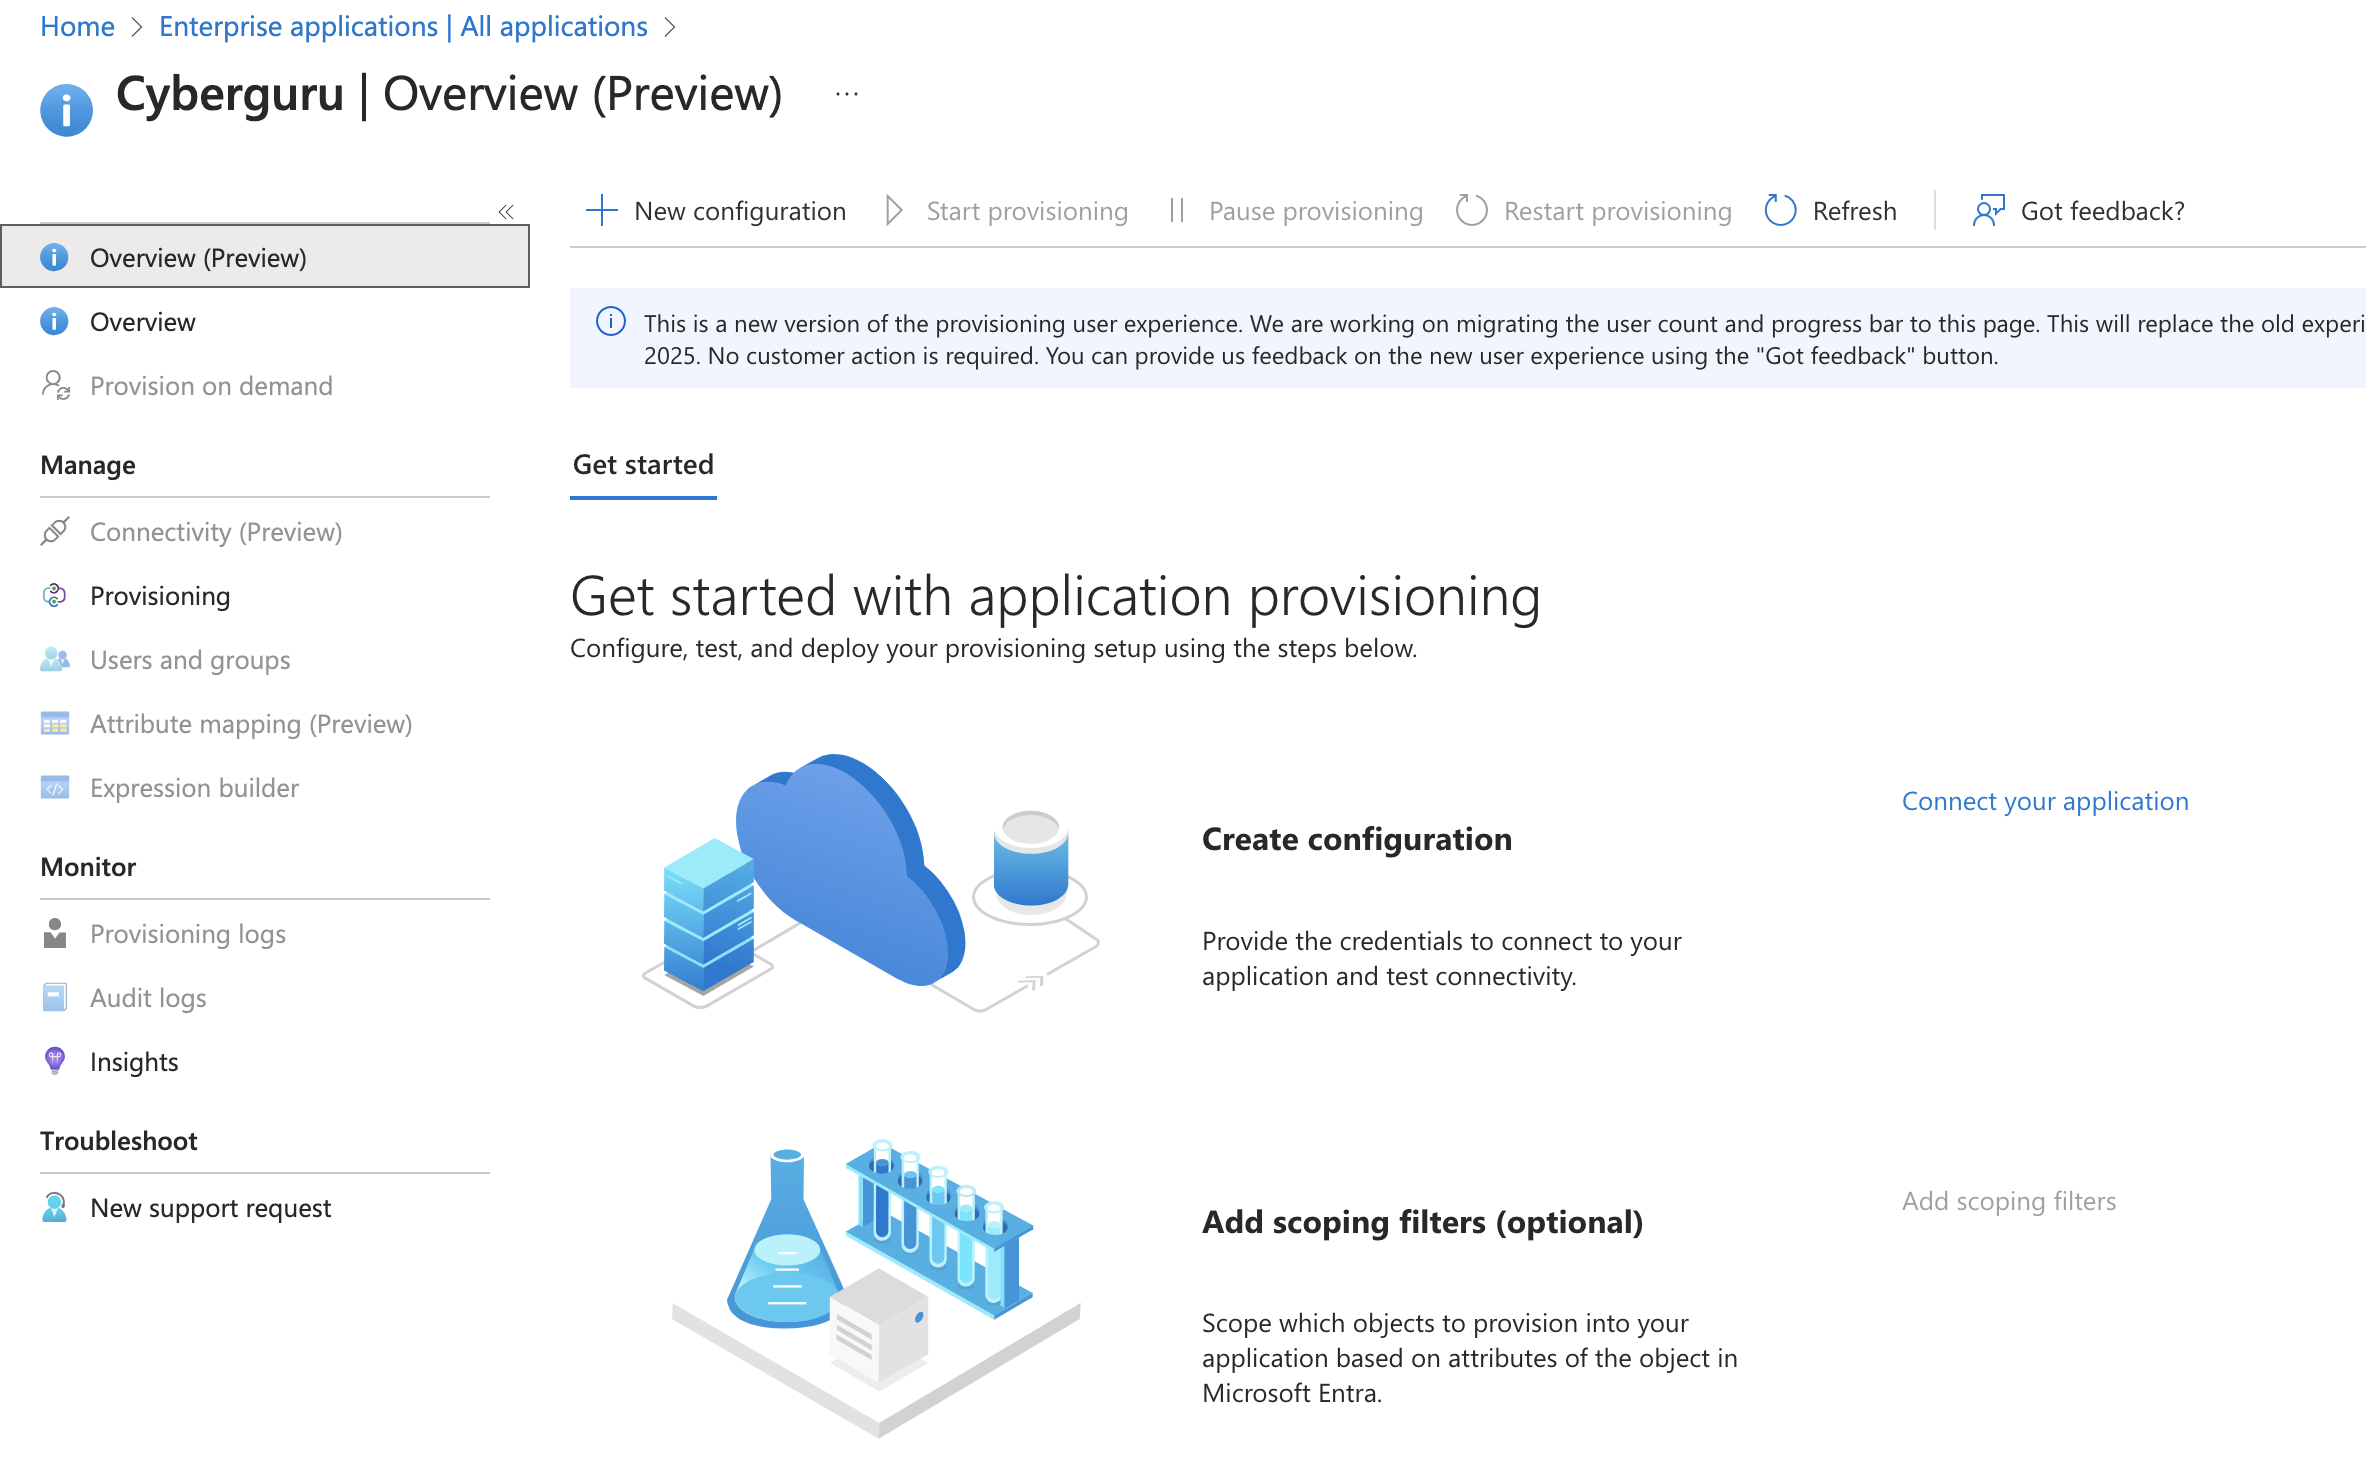
Click on “Connect your application”
4.4. Step 4: Setting Up the Connection
You will now need to enter specific information to connect Microsoft Entra with Cyberguru. This include:
Tenant URL: The web address provided by Cyber Guru where user data is sent.
Secret Token or Authentication Key: A unique key provided by Cyber Guru that allows Microsoft Entra to securely communicate with it.
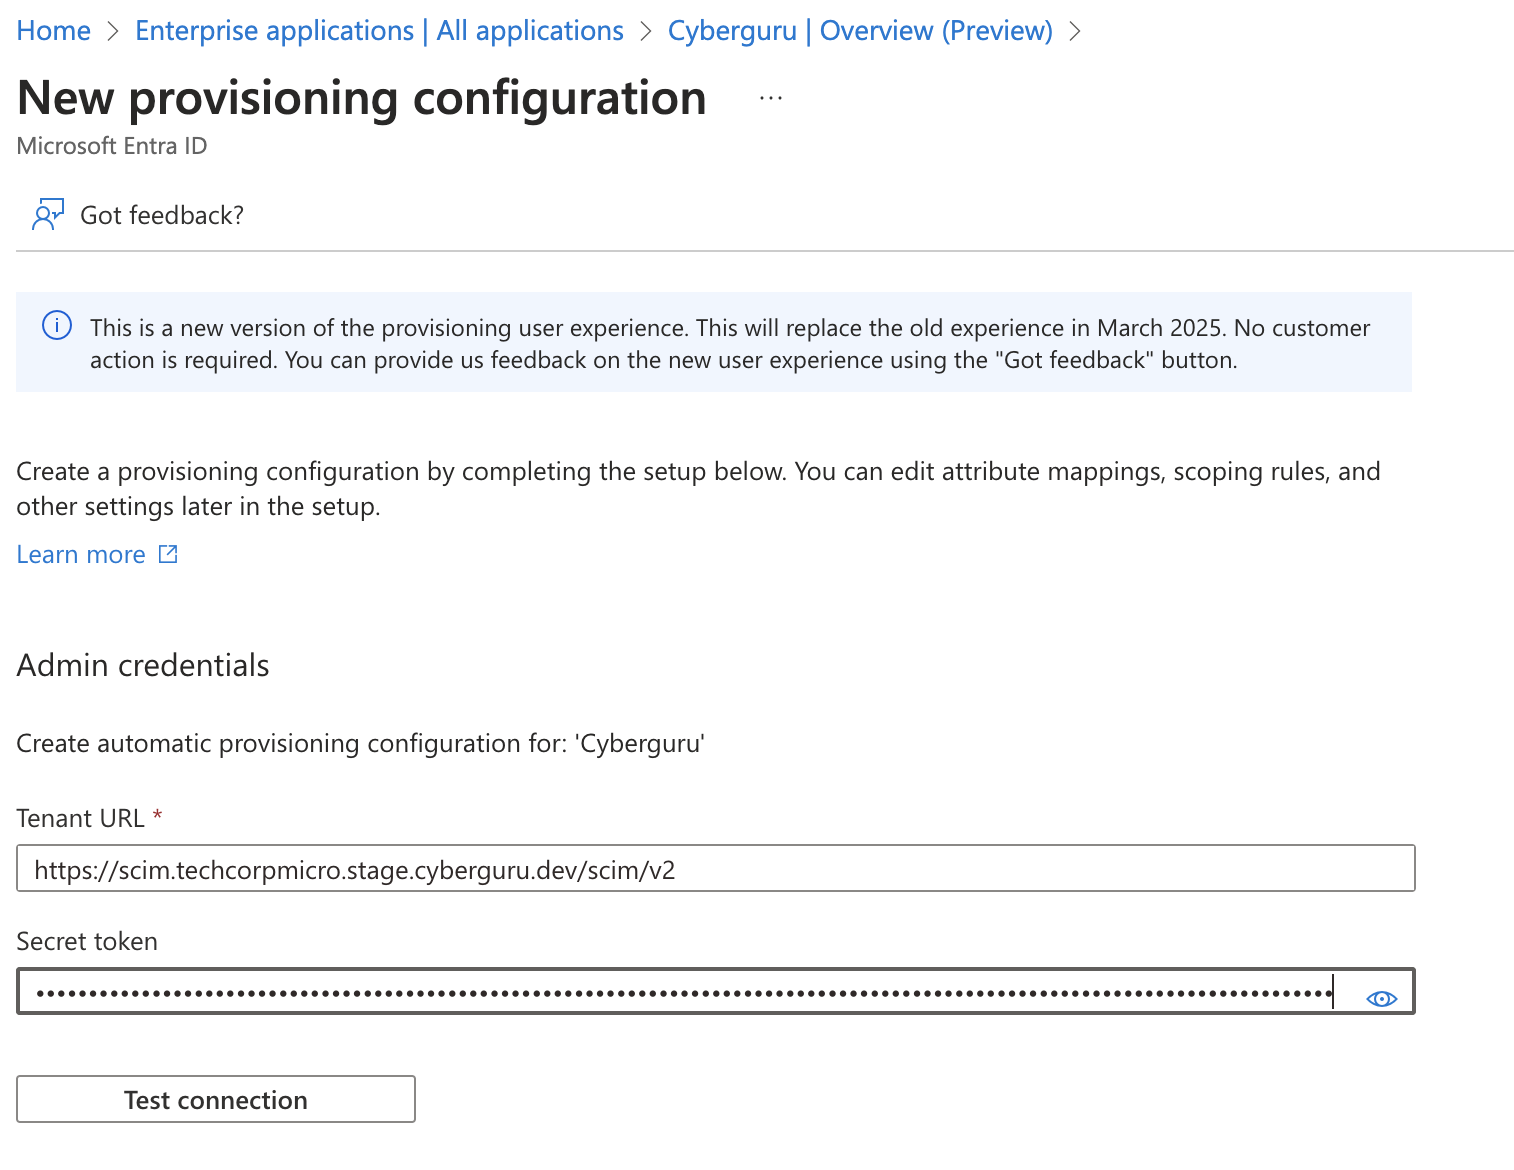
Click on “Test connection” .
If the test is successful, you’ll see a confirmation message.
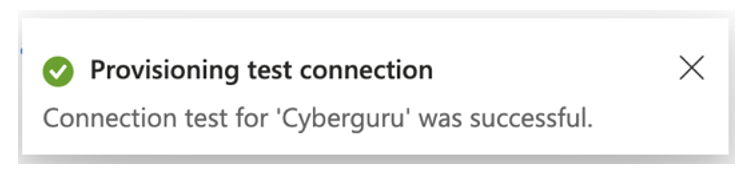
If not, check the details entered and try again.
If issues persist, contact your IT support or the application vendor.
Click “Create”
4.5. Configure attributes mapping
4.5.1. Disable group provisioning
First of all we will have to disable the provisioning of groups because not enabled in Cyber Guru platform.
On the left menu select “Attribute Mapping
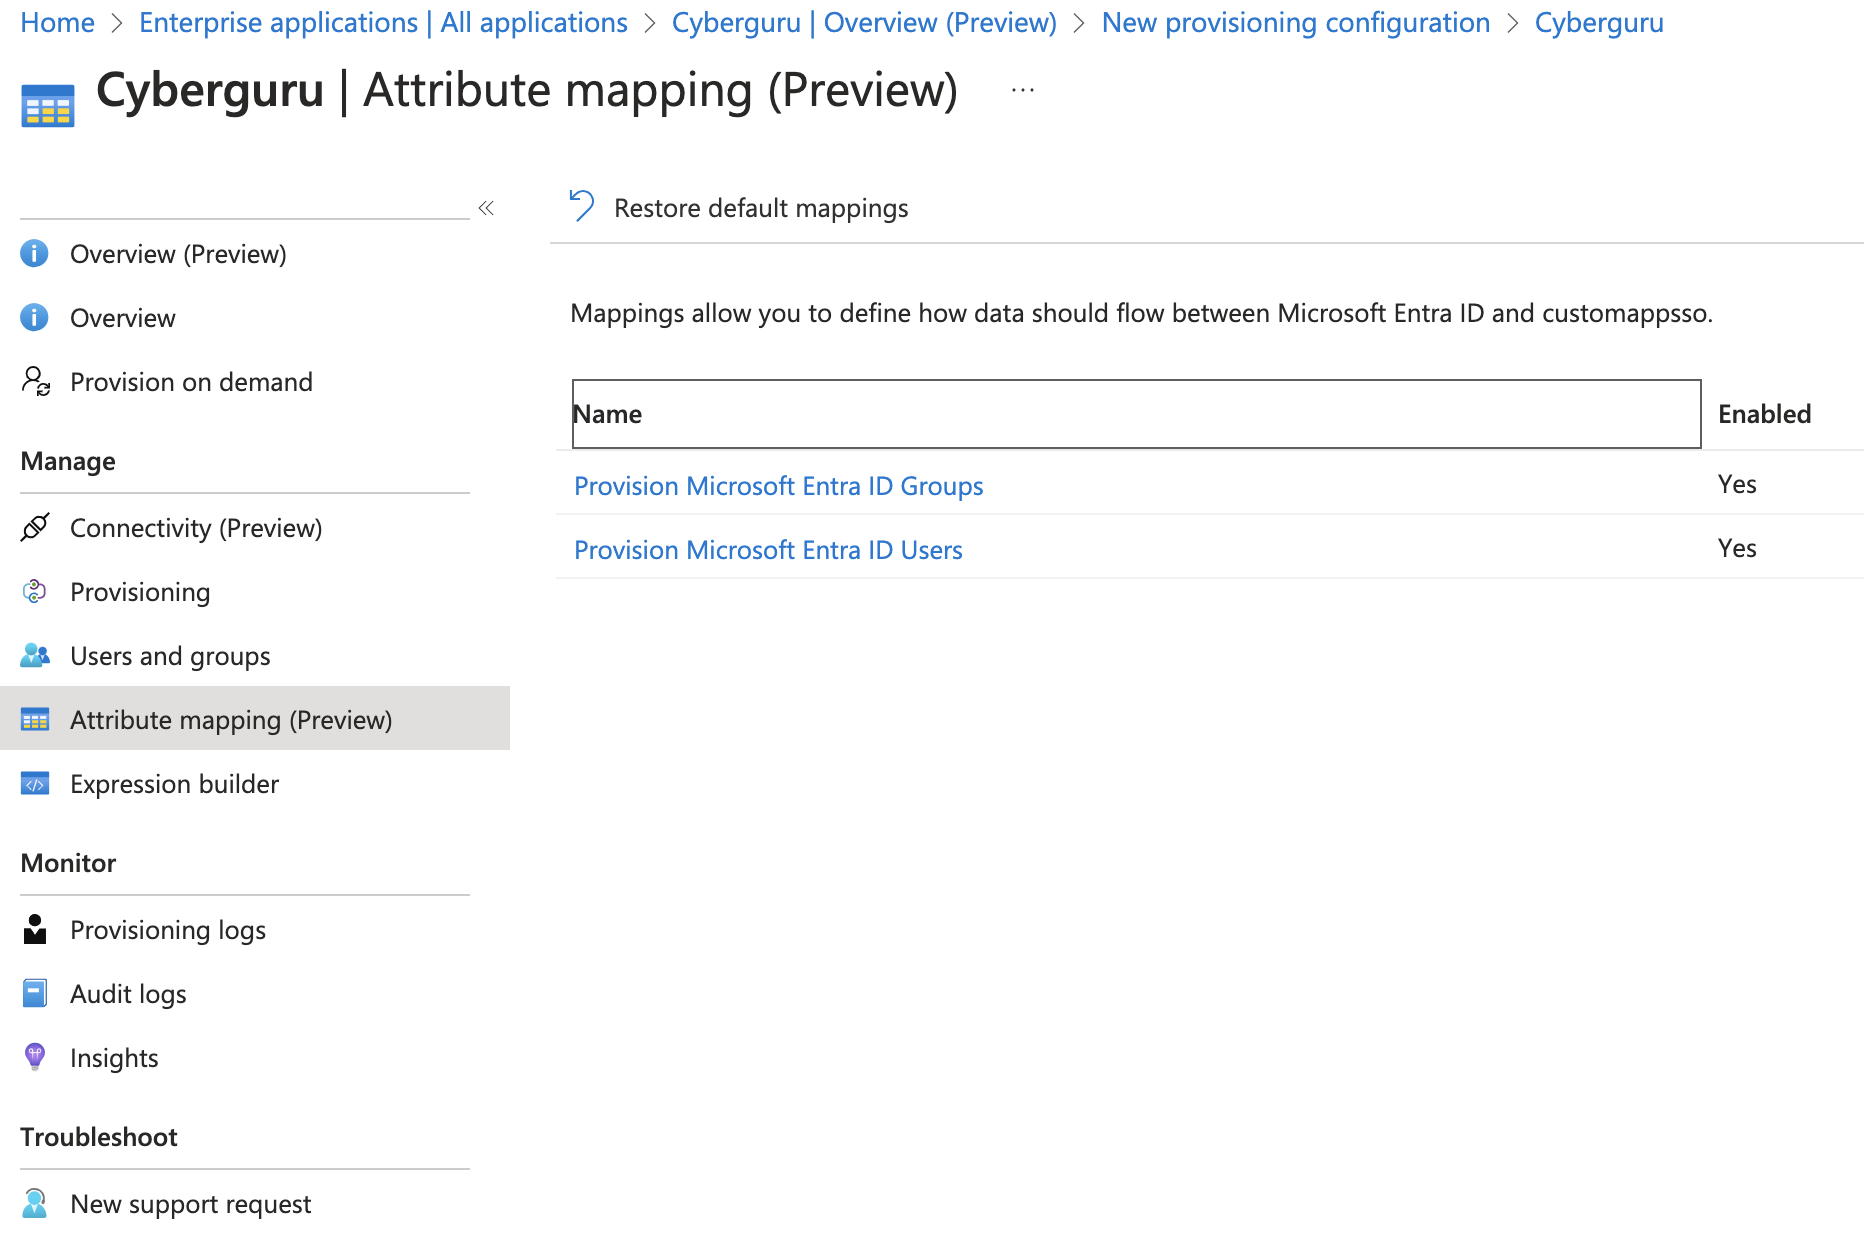
Select “Provision Microsoft Entra ID Groups” and set the “Enable” button to “No”
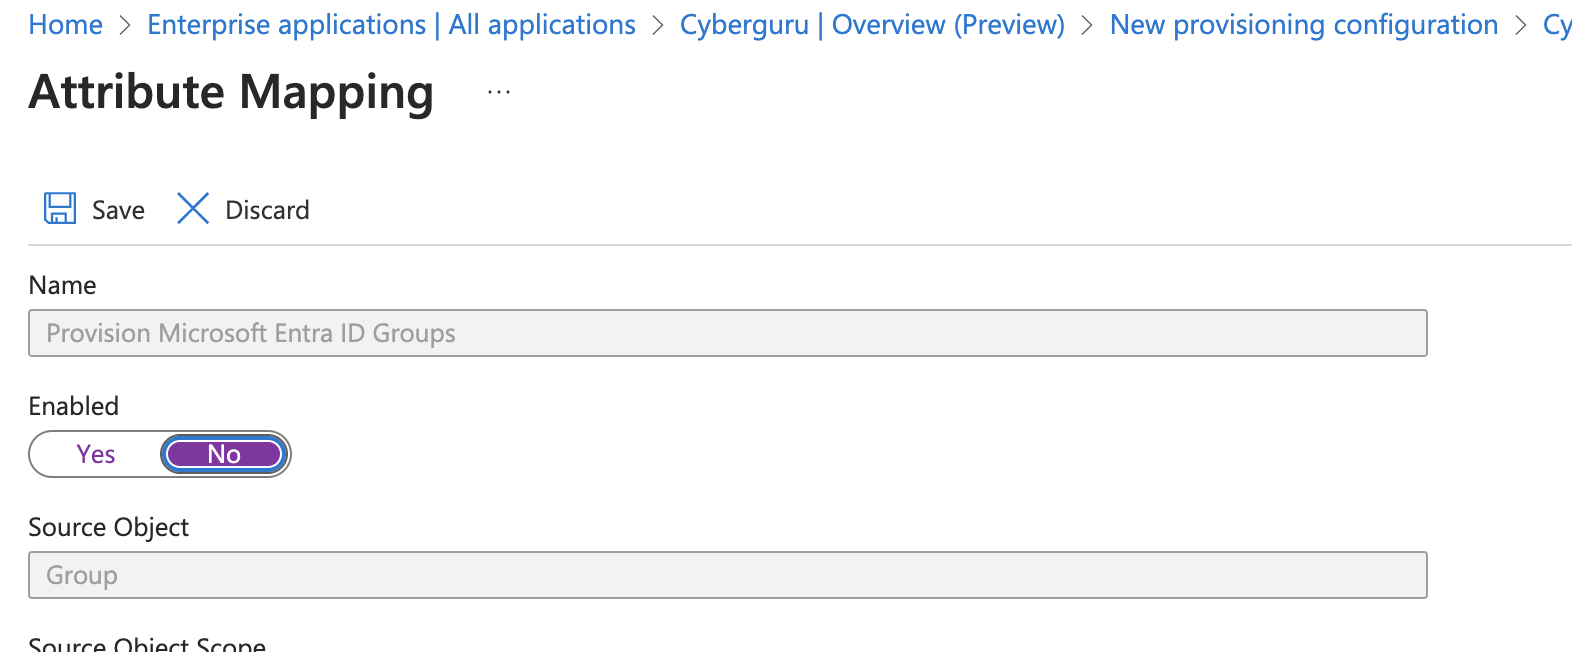
Click “Save” you should see now:

4.5.2. Mapping Attributes
On the previous screen click now on “Provision Microsoft Entra ID Users”. The full list of attributes will be displayed. The ones highlighted in red are the ones actually used by Cyber Guru platform.

Next steps will be:
To eliminate all the not necessary attributes
Add “locale” mapping for the language. This is the language of the user from the Awareness platform and (in case of phishing) for the mail template.
Edit “country” mapping for the user’s country. This is the country of the user from the Awareness platform and (in case of phishing) for the mail template.
Add mappings for the organizations defined in the Cyber Guru company
Review and fine tuning the mappings
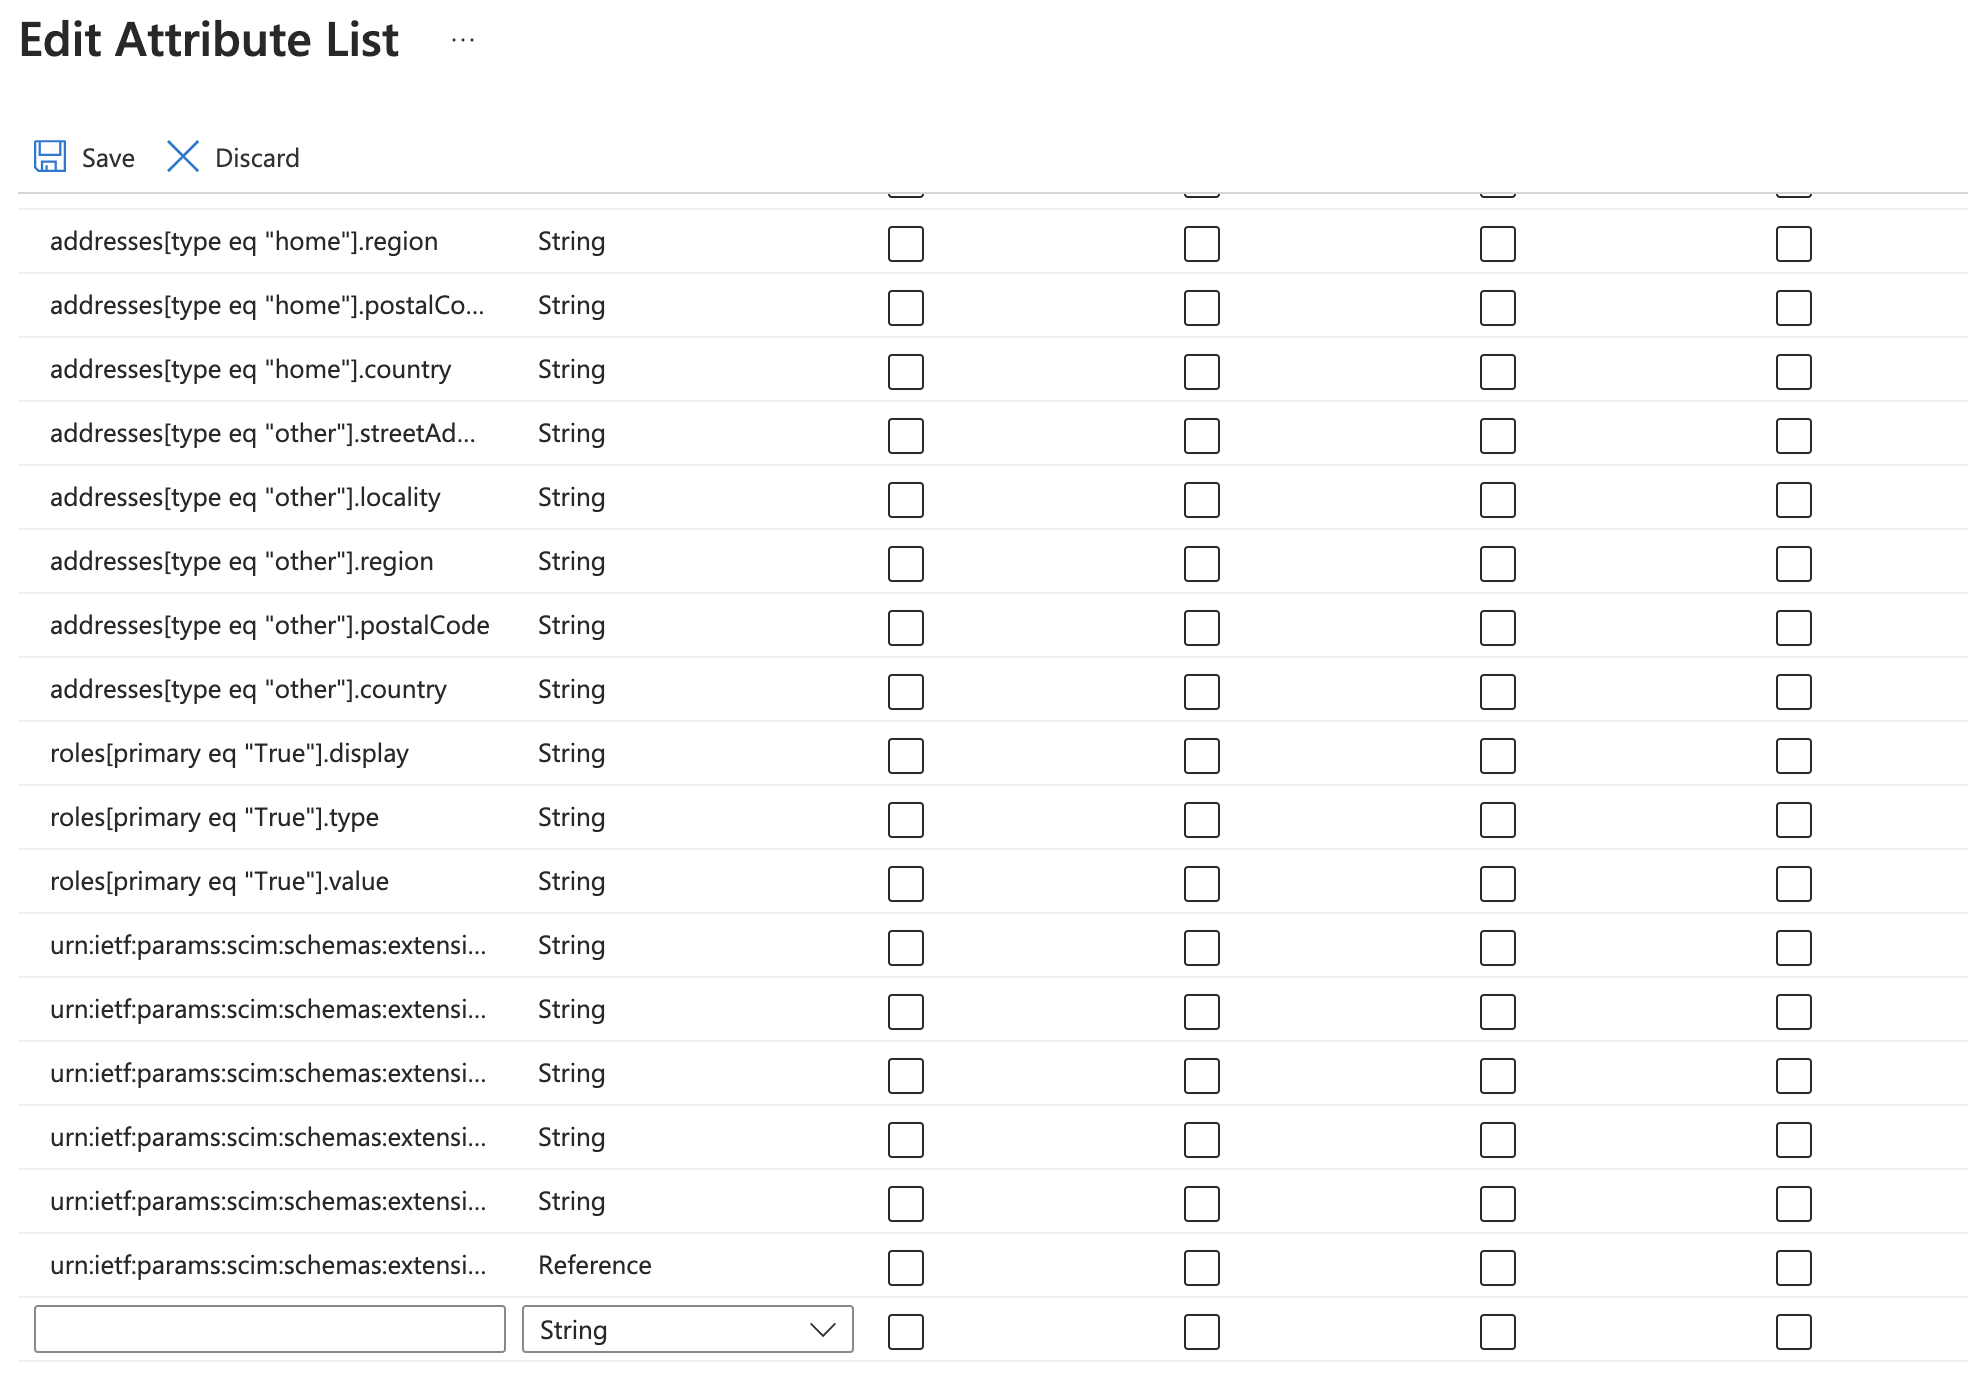
Eliminate with the “Delete” button the attributes:
displayName
title
preferredLanguage
name.formatted
addresses[type eq "work"].formatted
addresses[type eq "work"].streetAddress
addresses[type eq "work"].locality
addresses[type eq "work"].region
addresses[type eq "work"].postalCode
phoneNumbers[type eq "work"].value
phoneNumbers[type eq "fax"].value
urn:ietf:params:scim:schemas:extension:enterprise:2.0:User:employeeNumber
urn:ietf:params:scim:schemas:extension:enterprise:2.0:User:department
urn:ietf:params:scim:schemas:extension:enterprise:2.0:User:manager
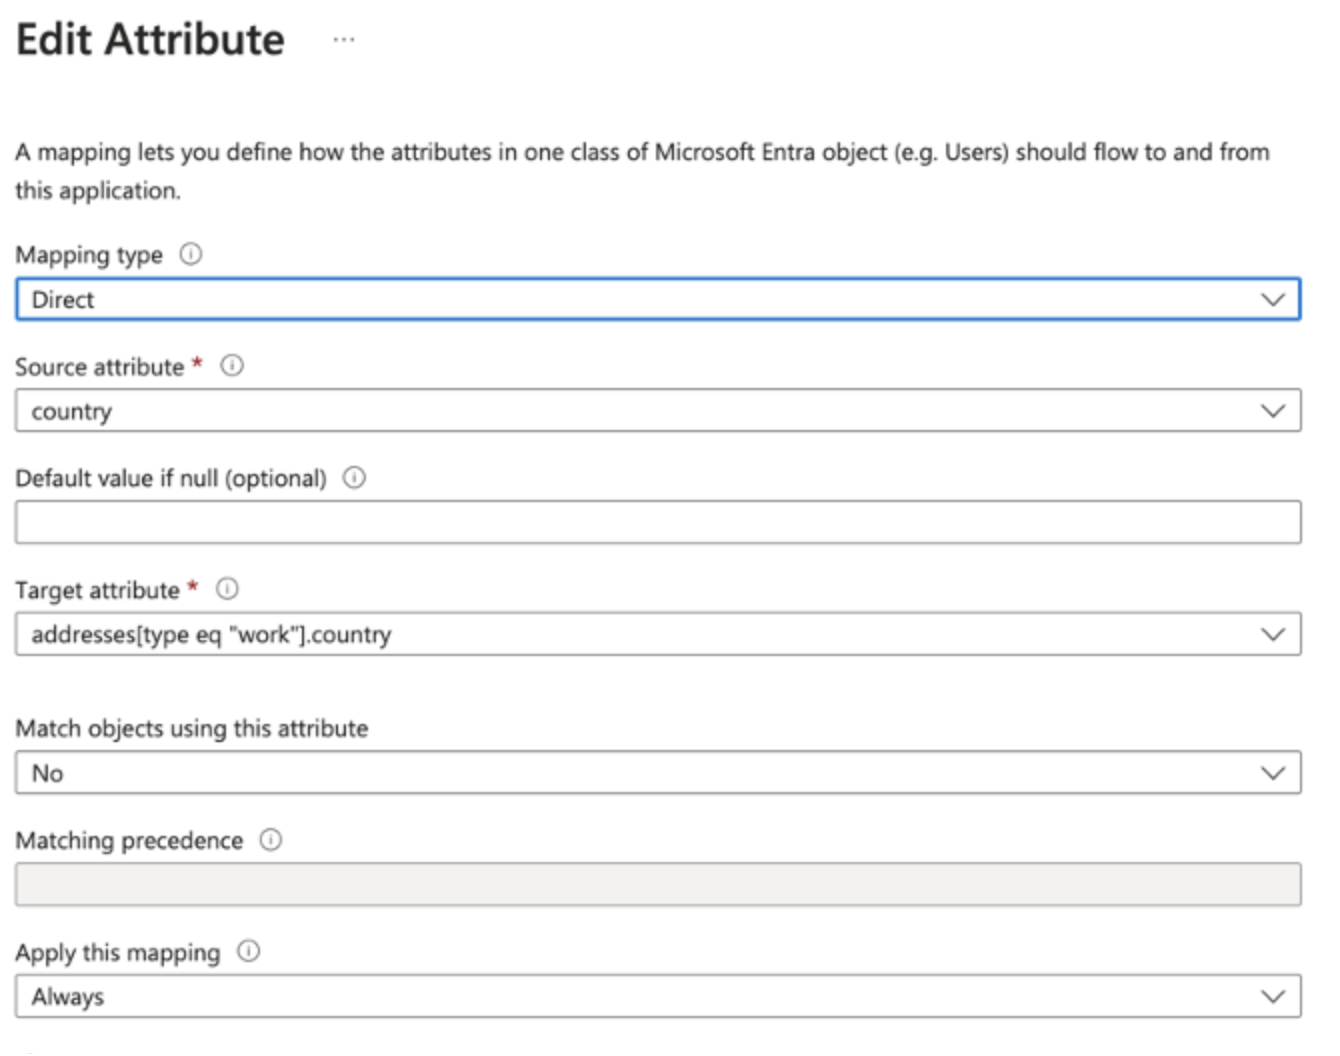
Let’s add “locale” attribute:
Click on “Add New Mapping” and provide the source and target attribute as shown below:

The attribute locale must be of two lowercase letters indicating the language used in our platform (as per ISO 639 language codes). That means we expect the Source attribute to contain such a value. If not, just use another attribute or consider using an expression to derive the value from other attributes.
For expression example please see the document “Hint&TipsSCIM”
Click “OK”
Click “Save”
Let’s check mapping for country attribute.
Just be sure in in the “source” attribute there is the value of the country with two capital letter characters. If not, just use another attribute or consider using an expression to derive the value from other attributes.
For expression example please see the document “Hint&TipsSCIM”
Click “OK”
Click “Save”
Add organization’s attributes
To add this mappings we must create the attribute first. For this guide we have prepared a company in Cyber Guru with three organizations :
Office
Jobtitle
Department
This is just an example. If you have more organizations you can add them as per the procedure below.
At the bottom of the page select “Show advanced options”
Select “Edit attribute list for customappsso”
At the bottom of the page you’ll see an empty field.
Fill the empty field with the name of the organizations with
urn:ietf:params:scim:schemas:extension:Tags:2.0:User:DepartmentBe carefull the latest part of the name contains the exact organisation (Department) created in the company (it’s case sensitive)
Click “Save”
Repeat the steps for organizations:
urn:ietf:params:scim:schemas:extension:Tags:2.0:User:Jobtitle

urn:ietf:params:scim:schemas:extension:Tags:2.0:User:Office
Go to the Attribute mapping screen that now will look like the following:
Click “Add new mapping”
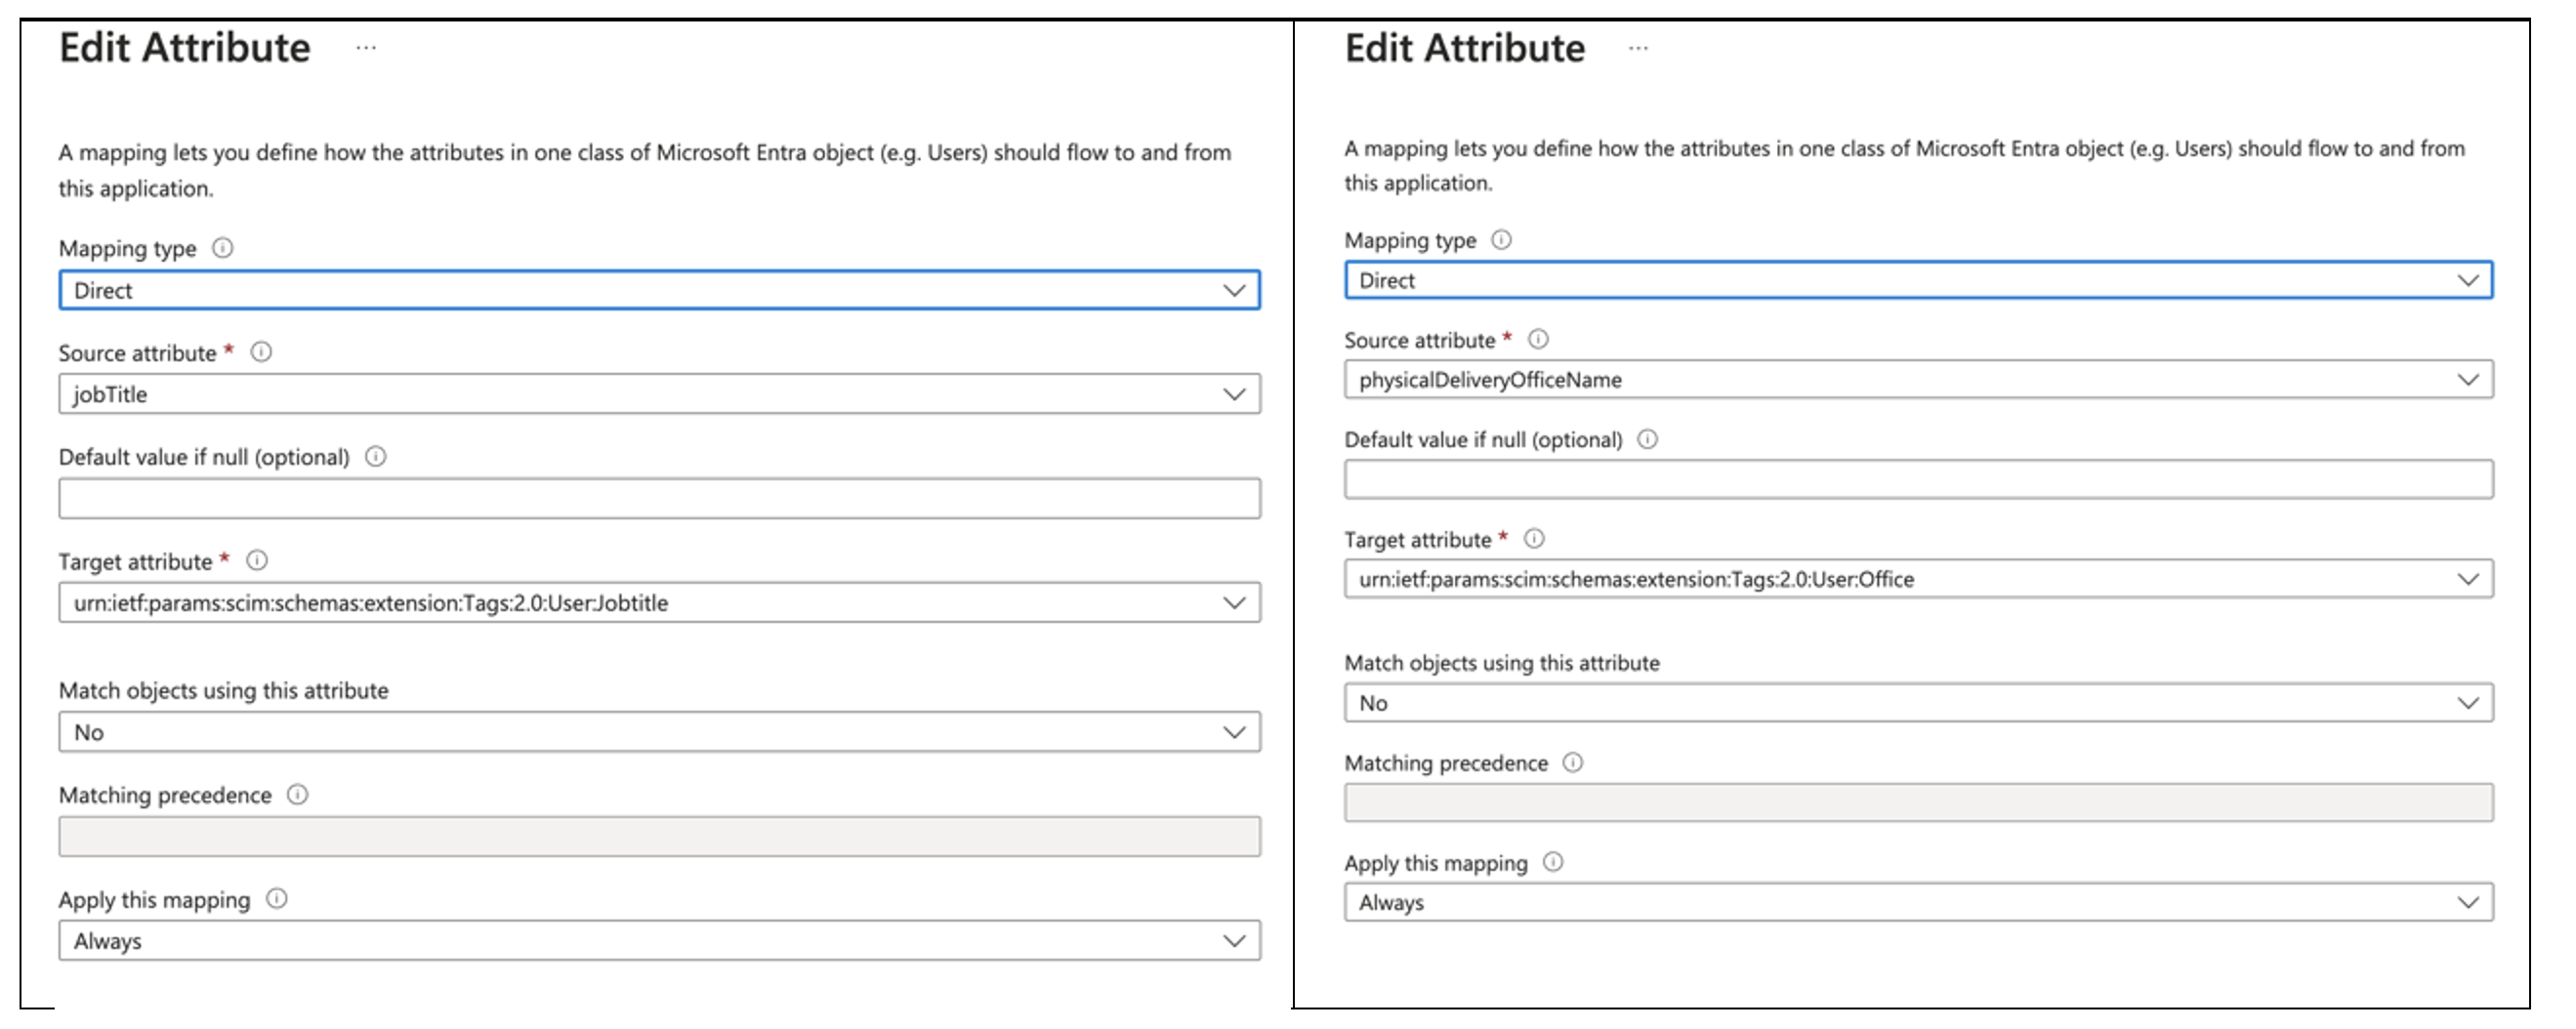
Insert the values in the source and target fields for the Department Organization:
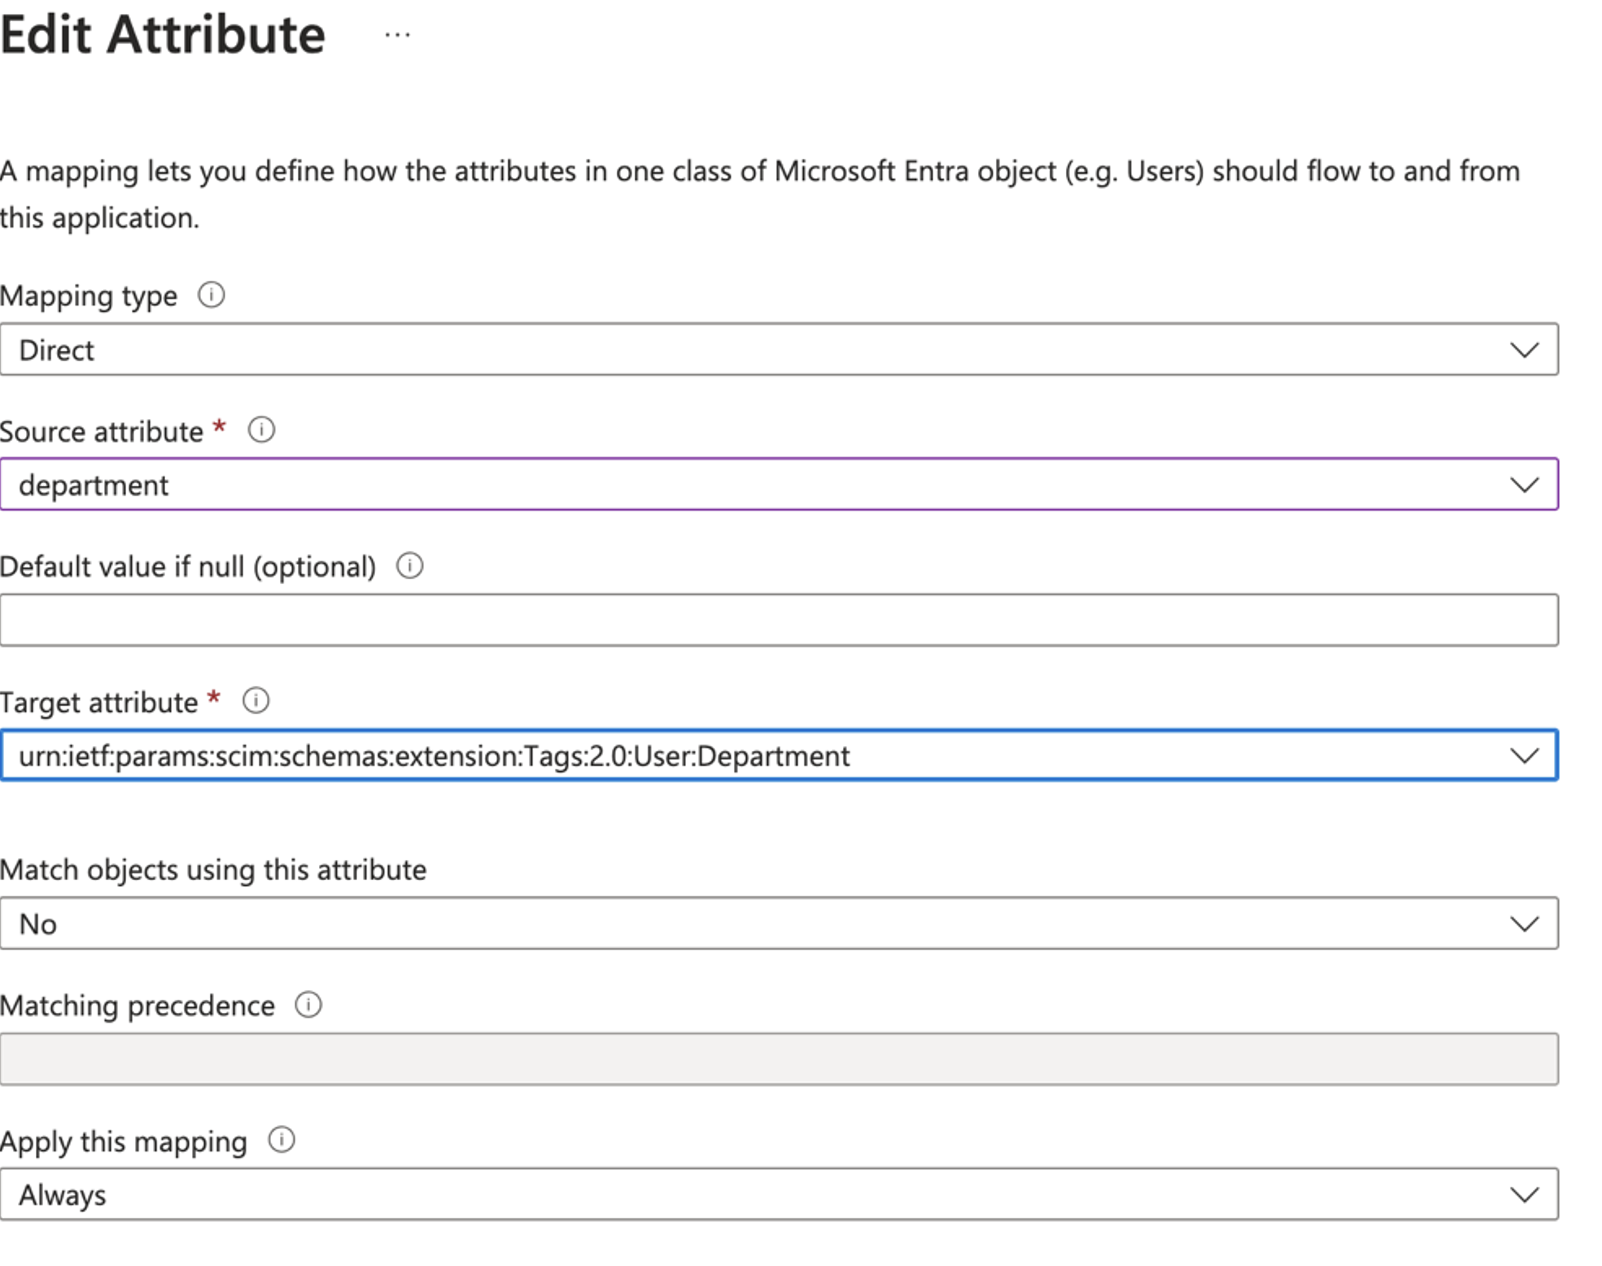
In this example we are mapping to the “department” attribute in Microsoft Entra User profile. If you have the suitable value in another attribute of Microsoft Entra User profile, just select it from the list of Source attribute.
Pay attention to this attributes. They “must” have values in Microsoft Entra. Once SCIM is activated it is not possible to manually update this values in Cyber Guru Platform
Click “OK”
Click “Save”
Repeat for the other two organizations mapping Office to physicalDeliveryOfficeName and Jobtitle to jobtitle
4.5.3. Configure other mappings and review
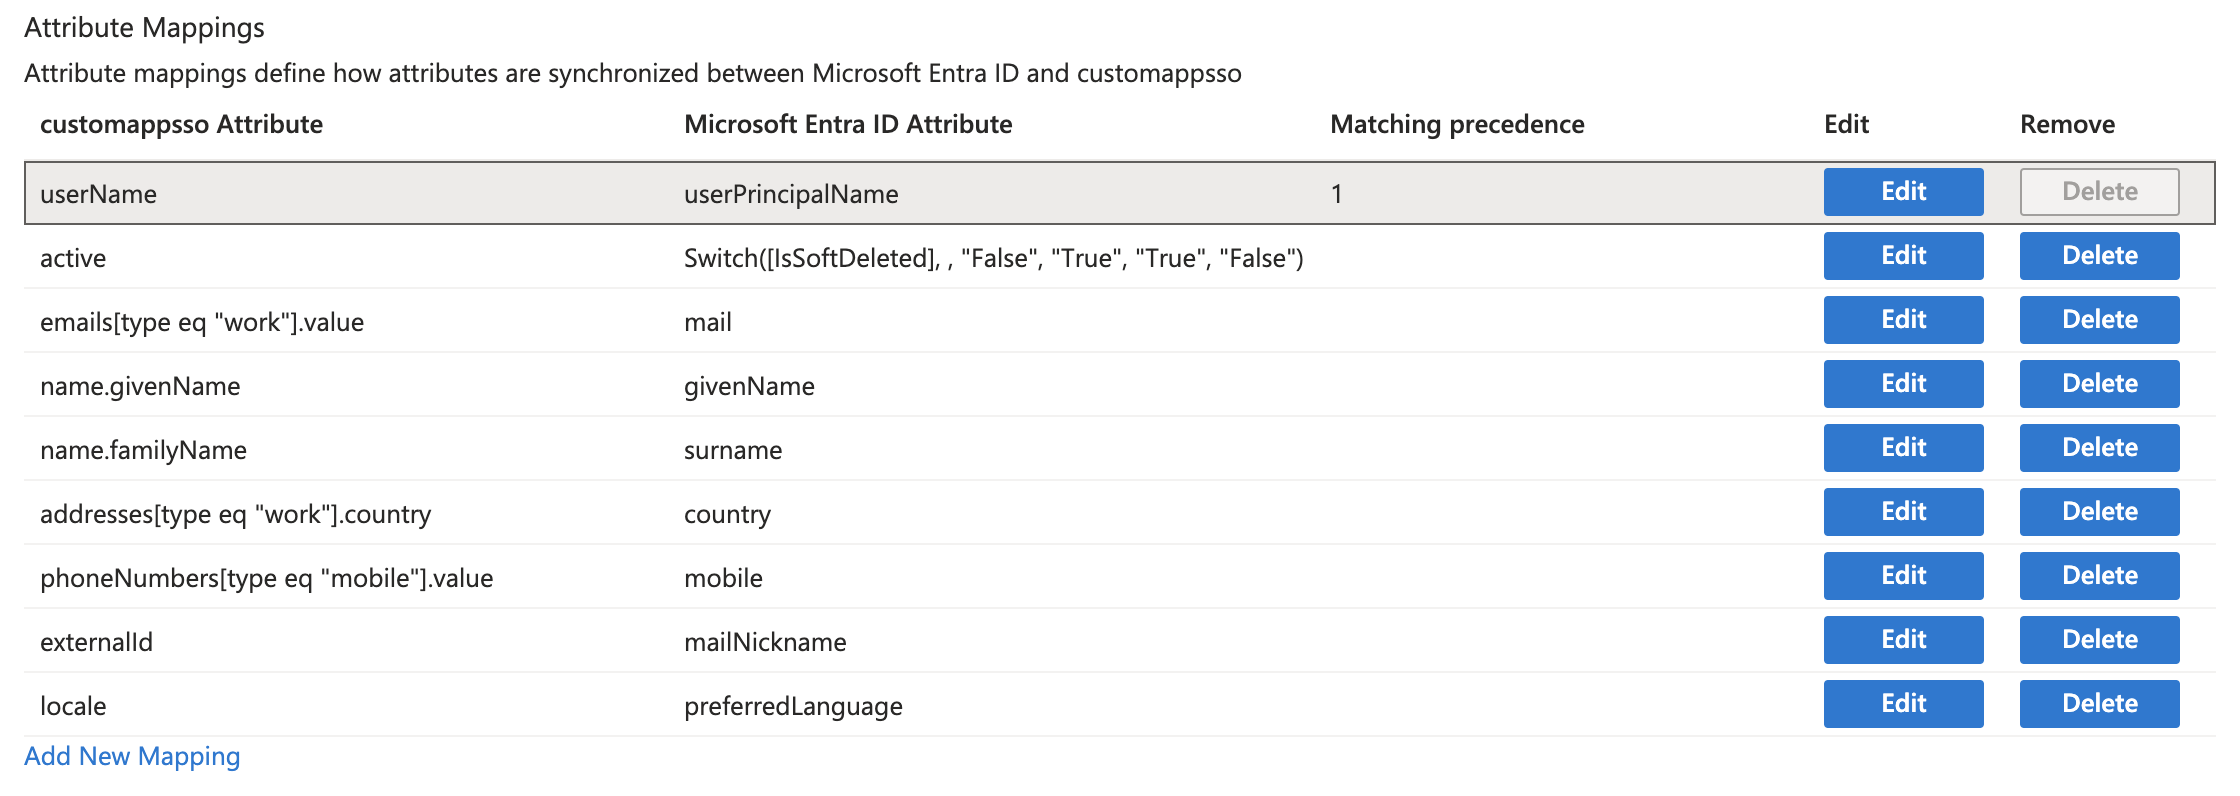
The list of attribute mapping now will look like the following :
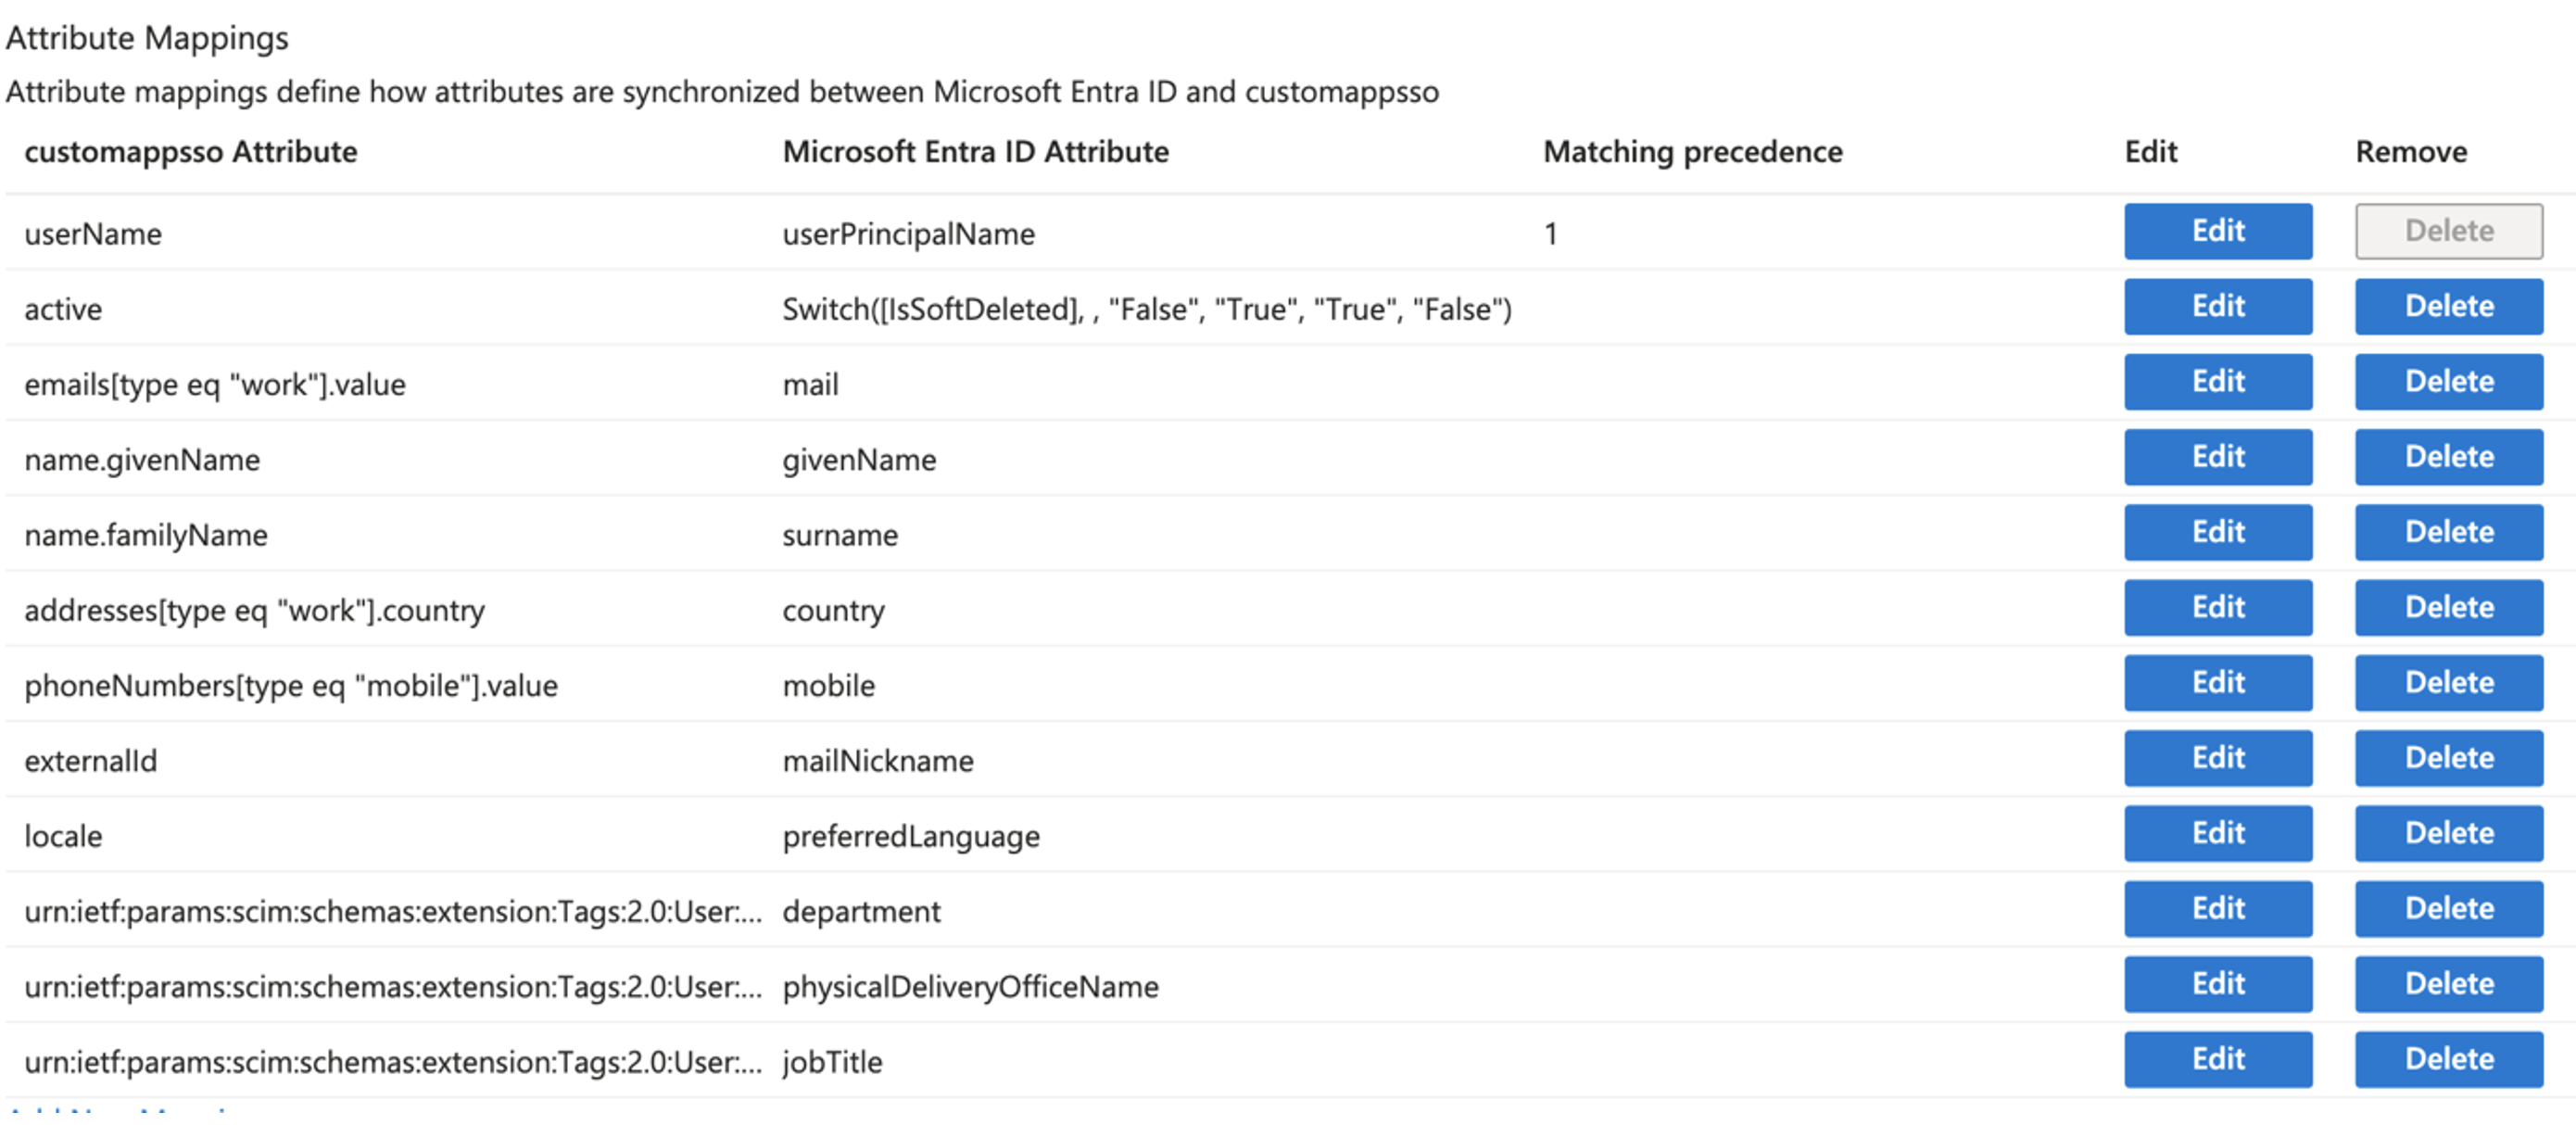
Let’s pay attention to the “userName” and “externalId”
Our platform expect the same value in the two fields. This value must not change in the future so please chose carefully the source values. We strongly suggest to use badge numbers or id codes or Active Directory objectid etc.
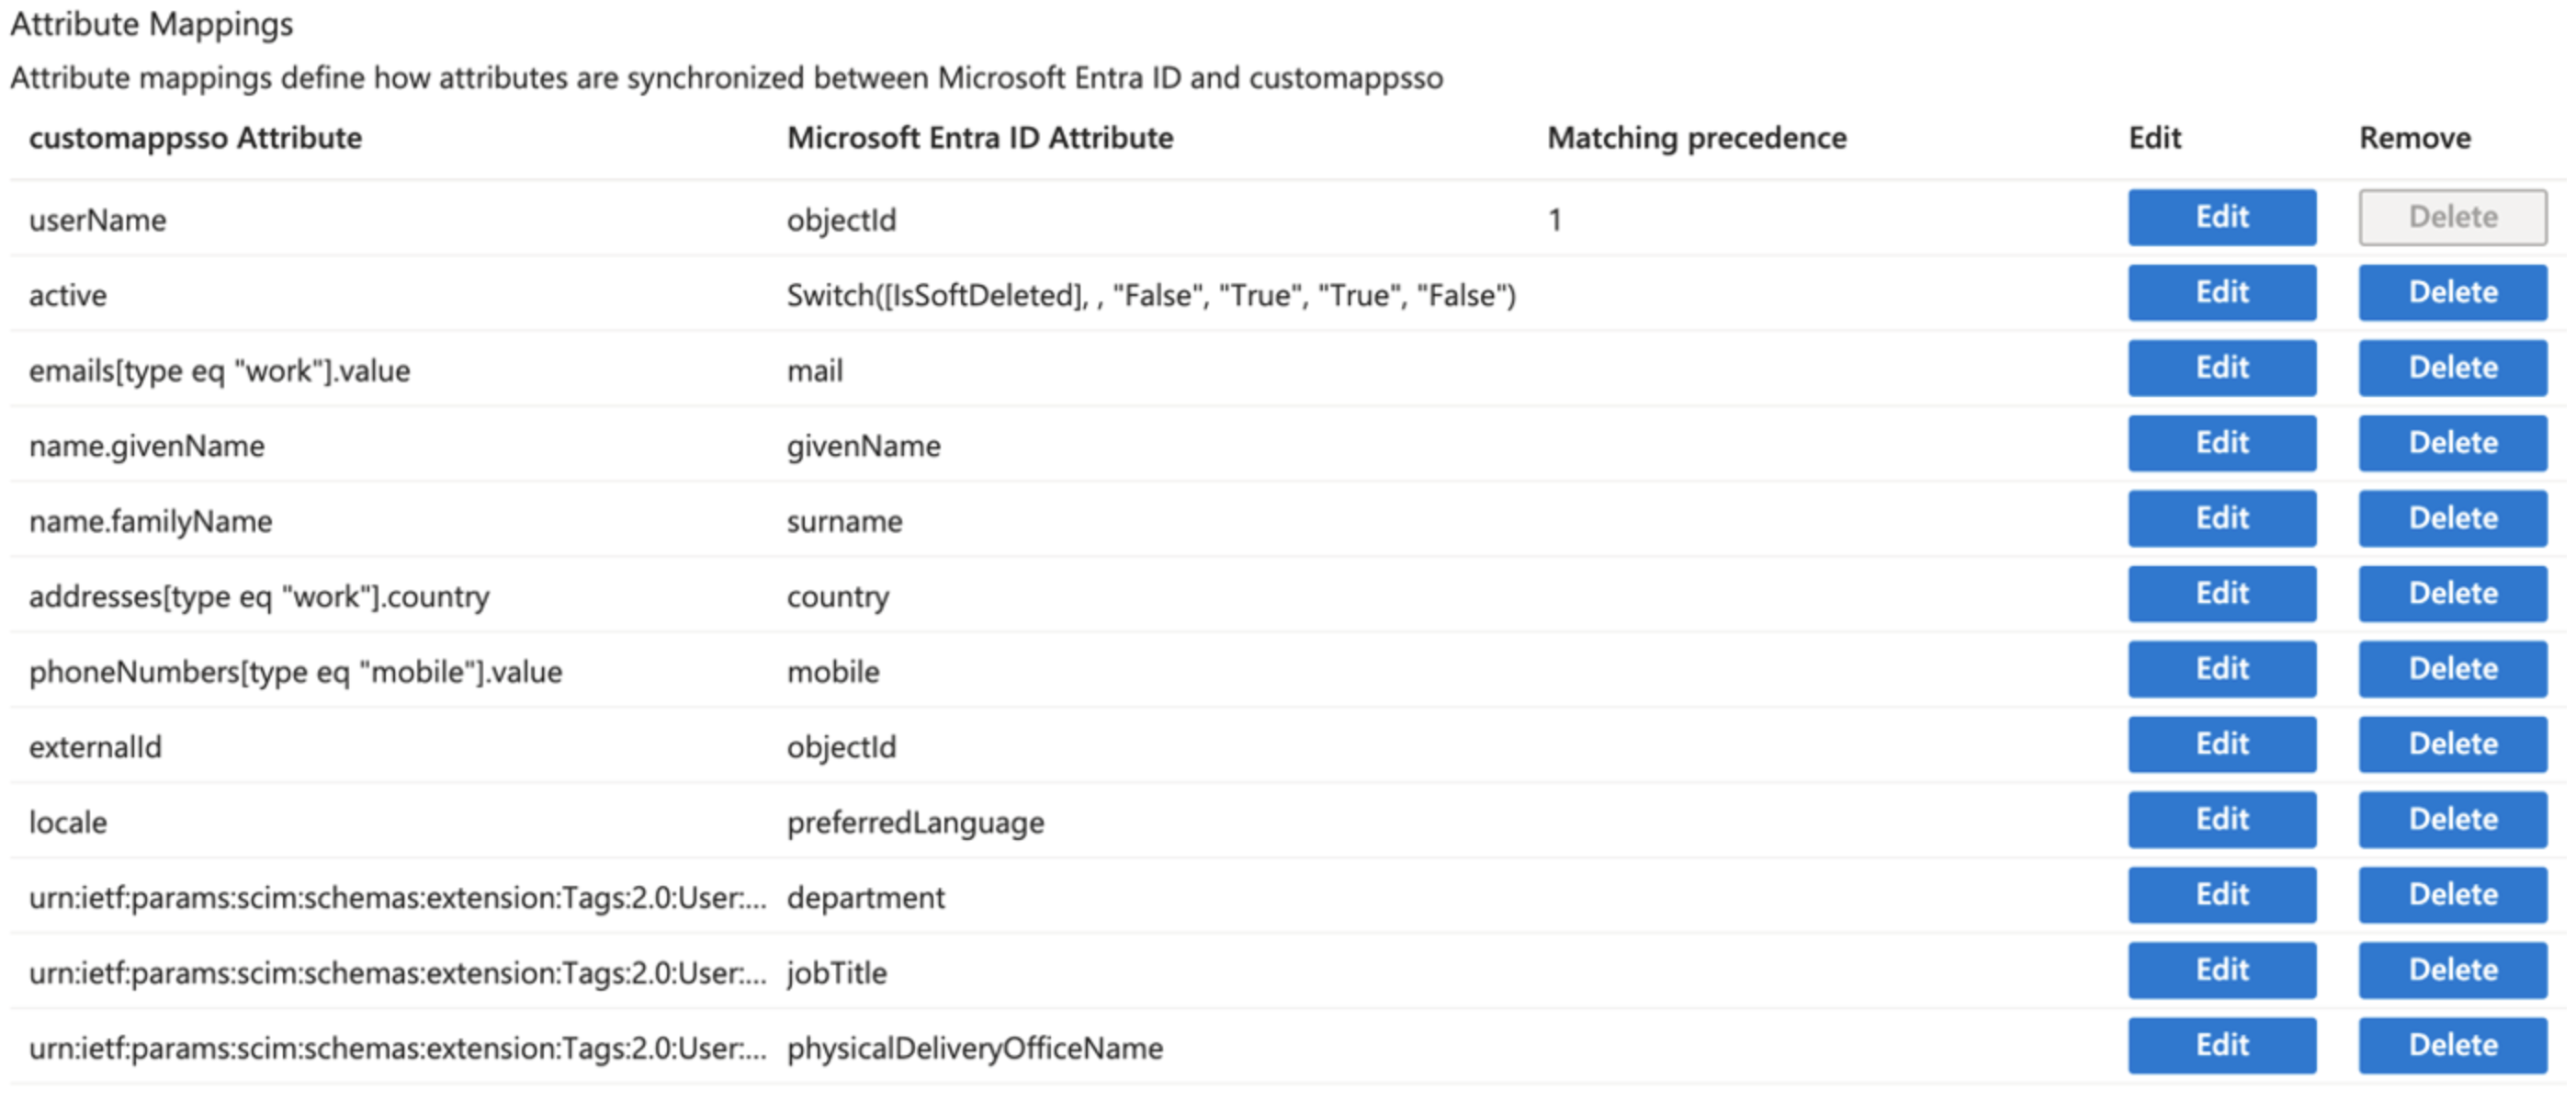
If the application has SSO configured , it’s is foreseable to use the “objectId” Ov Microsoft Entra User for these atttributes. Let’s assume we are in this case and change the mapping of the two attributes as follows :

Click “ok” and “Save” on both
Let’s run a final check on the attributes:
We are now ready for the test
4.6. Test provisioning
The test will be run on single users before activating the automatic provisioning.
Chose a user and authorise it in the Cyber Guru application.
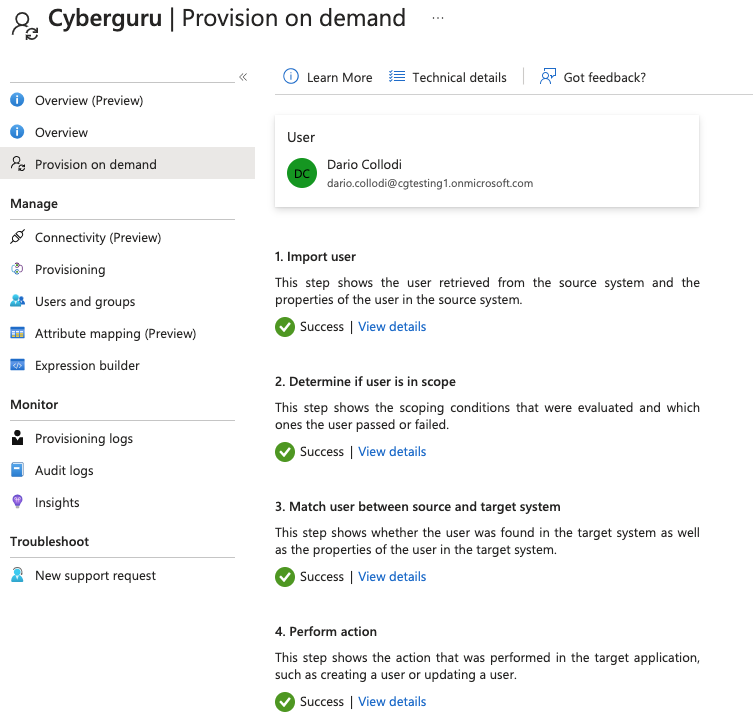
Go to the Cyber Guru Application, click on “Provisioning” in the left menu and then “Provision on demand”. Select the authorised user like in the example:


And click “Provision”
In case of success you’ receive the following:
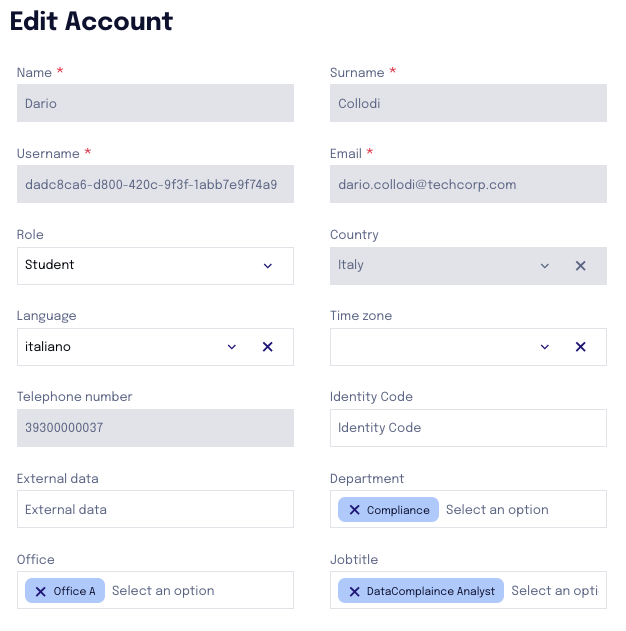
Check in the Cyber Guru platform the user correctly created :
4.7. Step 7: Choosing User Synchronization Settings
Decide which users should be provisioned to the application. There might be options to:
Sync all users
Sync only users in specific groups (for example, “HR Employees” or “Sales Team”)
Choose the option that best fits your organization’s needs.
4.8. Step 8: Starting Provisioning
Review the information you’ve entered to ensure everything is correct.
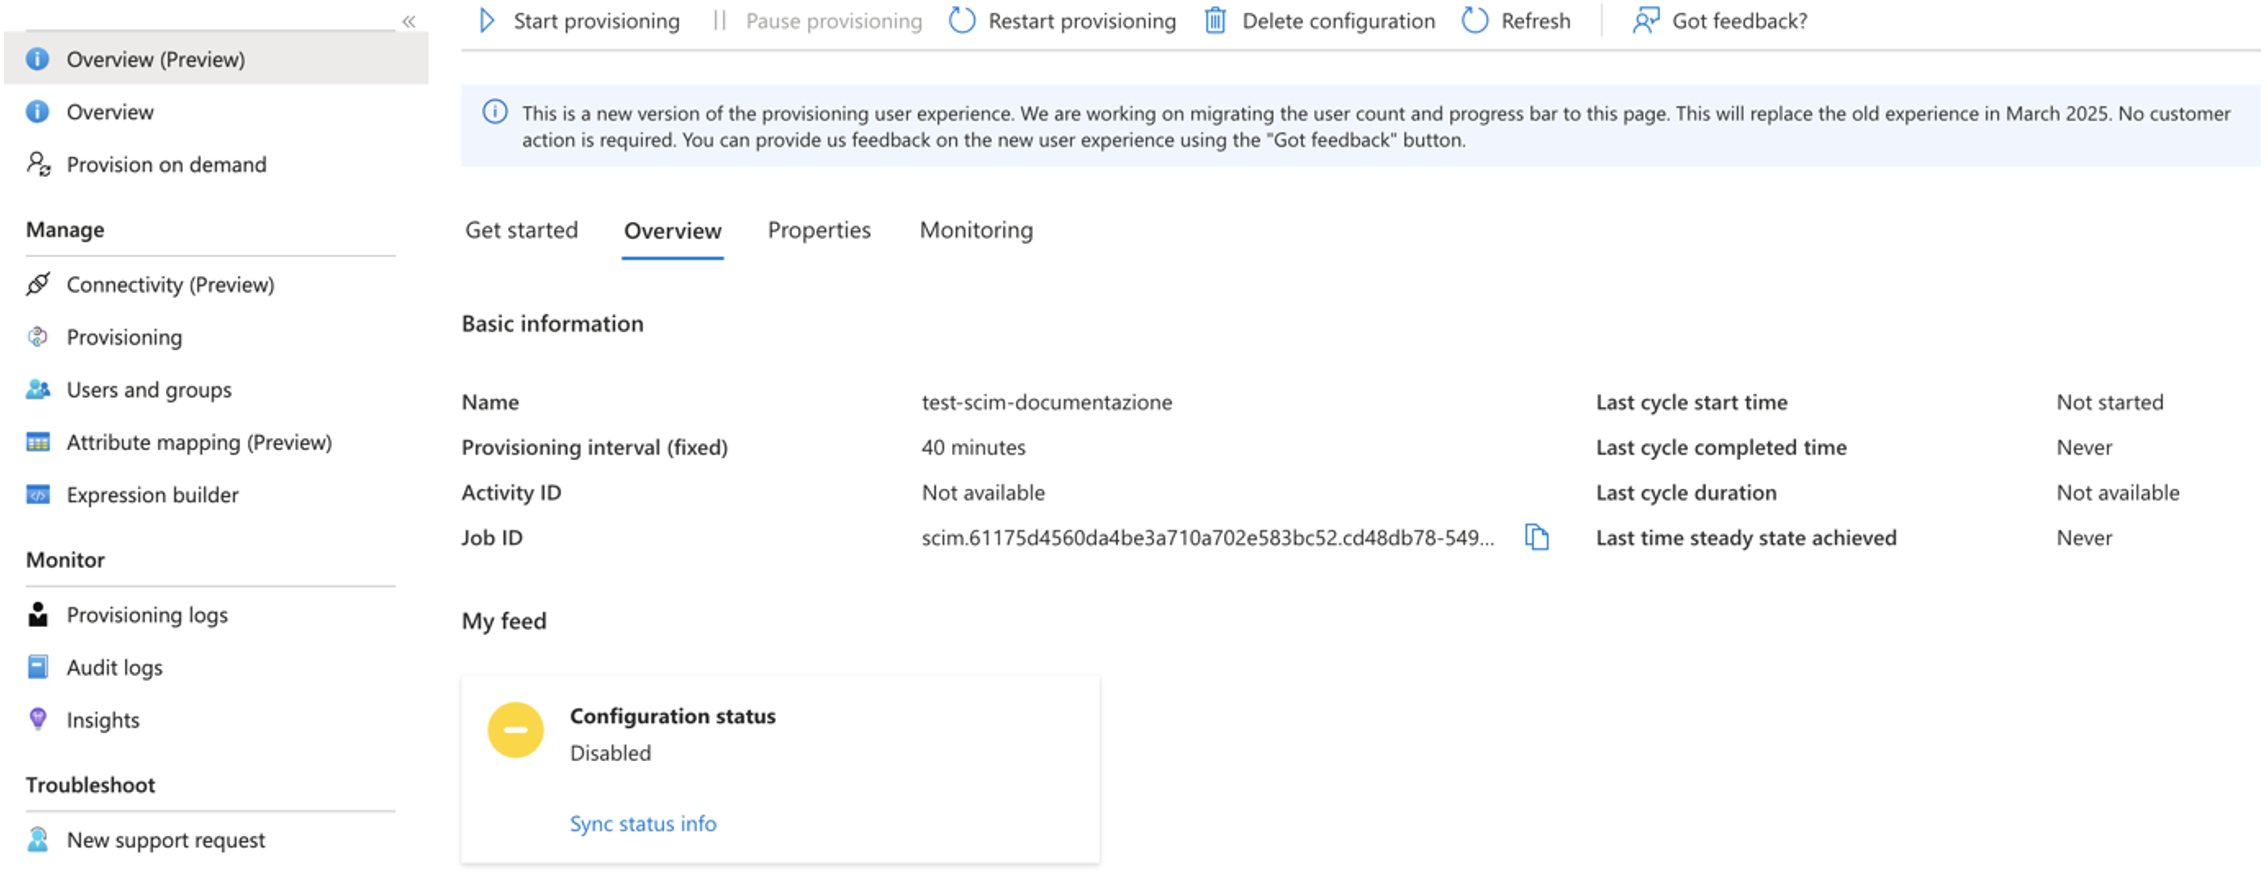
Go to the applicatioon, select “Overview” on the left menu and click the “Start Provisioning” button.
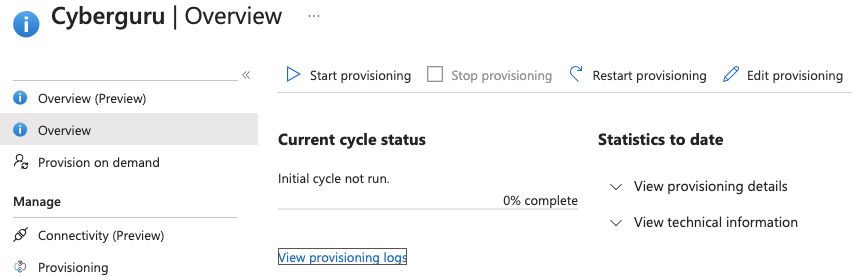
Once started, Microsoft Entra will begin to sync user information to Cyber Guru platform based on the rules you set with a frequency of 40 minutes.
5. What to Expect
New user accounts will be created automatically.
Updates to user information (such as job title changes) in Microsoft Entra will be reflected in the application during the next synchronization cycle.
If a user leaves the organization, their access be will automatically suspended in Cyberguru platform. We suspend iinstead of deleting because just in case the customer wants to re-enable the user it twill be done mantaining all the data of his/her course. Users can be completely deleted if the customer send us a specific request.
6. Troubleshooting & Support
Double-check that the endpoint URL and secret token are entered correctly.
If the connection test fails, review the details with your IT support or consult documentation provided by your application vendor.
If you notice problems with user sync (e.g., users are missing or information did not update), check your group or user selection settings.
For further help, use the “Help” option in Microsoft Entra or contact your organization’s IT support team and Cyberguru support.